In this article:
Dehydrate Tomatillos: Temps, Times, Uses
Tomatillos turn into tangy little flavor grenades when you dry them low and slow, and you’ll love how easily they slip into salsas, soups, and spice mixes without fuss. Want a shelf-stable way to bottle up that bright, citrusy punch for months?
You picked the right project. I started dehydrating tomatillos after one very enthusiastic farmers’ market run, and now I keep a jar on standby because weeknight tacos wait for no one.
Why Dehydrate Tomatillos
You concentrate flavor when you remove water, so tomatillos taste brighter, sweeter, and a little more savory after a good dry. You also shrink them down to snackable, stashable pieces that fit neatly in jars or bags. You stretch your harvest with a method that stays simple, repeatable, and friendly to busy schedules.
Tomatillo powder and flakes give you instant salsa verde vibes without chopping, which saves time on meal prep. You also avoid waste because you preserve extra fruit from the garden or buy in bulk before it goes soft. You keep your freezer free for stock and ice cream, because the pantry handles these just fine.
Gear And Ingredients
You only need a few basics to nail a consistent result every time. Keep the kit simple, and you’ll repeat the process all season.
- A dehydrator with a thermostat settable to 125–135°F
- Fine mesh or fruit-leather sheets for diced pieces and powder projects
- A sharp knife and cutting board for clean, even slices
- Airtight jars or freezer-safe bags for storage after conditioning
- Labels and a marker for quick date tracking and pantry rotation
Prep Like A Pro
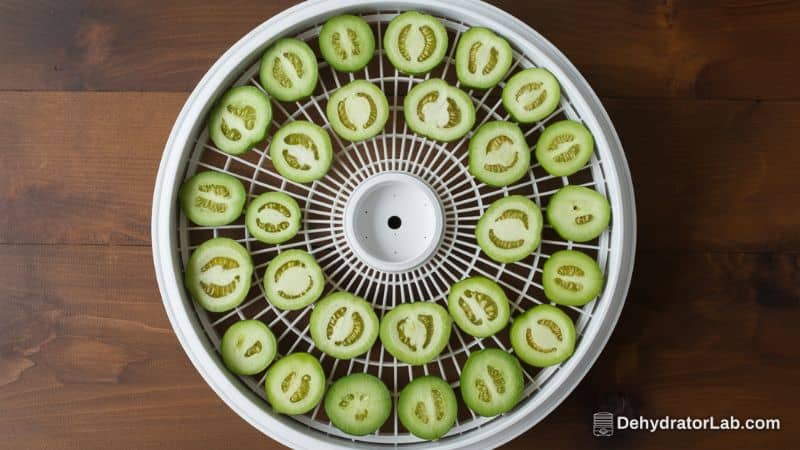
Start with firm, husked tomatillos that feel heavy for their size. Peel off the papery skins and wash the sticky coating until the fruit feels squeaky-clean. Dry them well with a towel so slices don’t slip around the board.
Halve each tomatillo through the stem end, remove a tough core if you notice one, and slice to about ¼ inch thick for even drying. Keep thickness consistent so slices finish together instead of trickling done one tray at a time. Line small bits on mesh or leather sheets so nothing falls through the racks.
Set Temperature And Load Trays
Set the dehydrator to 125–135°F to protect color and tang while you move moisture out. Place slices in a single layer with small gaps to promote airflow across the surface. Rotate trays halfway if your unit doesn’t self-rotate so you even out hot spots.
Wipe any excess juice off trays to reduce sticking and cleanup. Use a light oil spray on mesh sheets if you plan to dry diced pieces or puree them into fruit leather. Keep a little space between slices so air can do the heavy lifting.
How Long Does It Take
Drying times swing with slice thickness, humidity, airflow, and your dehydrator’s design. Expect a broad window of several hours up to the better part of a day, and start checking early so you don’t overshoot. Thin, consistent slices finish faster, while chunky quarters take more patience.
You control quality by testing doneness instead of chasing the clock. You can’t rush water out of a wet center, so give the process the time it needs and keep the temperature steady. You’ll get a clean, tart flavor when you finish at the right dryness.
Doneness Checks That Work
Let a test slice cool for a minute, then press it and check for tackiness. You want a dry, leathery feel with no shiny moisture on the surface. Tear a thicker piece and look for darker or glossy centers, since those signal water pockets that need more time.
Aim for slices that bend slightly but do not feel gummy or wet. Break a small piece and check for a clean tear instead of a rubbery pull. Ask yourself a quick question: would you trust this texture in a jar for months?
The Conditioning Step
After the slices cool to room temperature, pack them loosely in jars about two-thirds full and close the lids. Let the jars sit for 7–10 days at room temperature and shake them once daily to redistribute any remaining moisture. Watch the glass for condensation or clumping and return the food to the dehydrator if you notice either.
Conditioning equalizes moisture across pieces so you avoid hidden damp spots that invite mold. The step takes a week but saves a batch, so treat it like a smoke alarm for shelf stability. Once jars pass the no-condensation test, you can move on to long-term storage with confidence.
Smart Storage
Store conditioned tomatillos in airtight containers in a cool, dry, dark place. Choose jars for quick visual checks and easy scooping, or use heavy freezer bags when you prefer packable, flexible storage. Label each container with product and date so you rotate stock without guesswork.
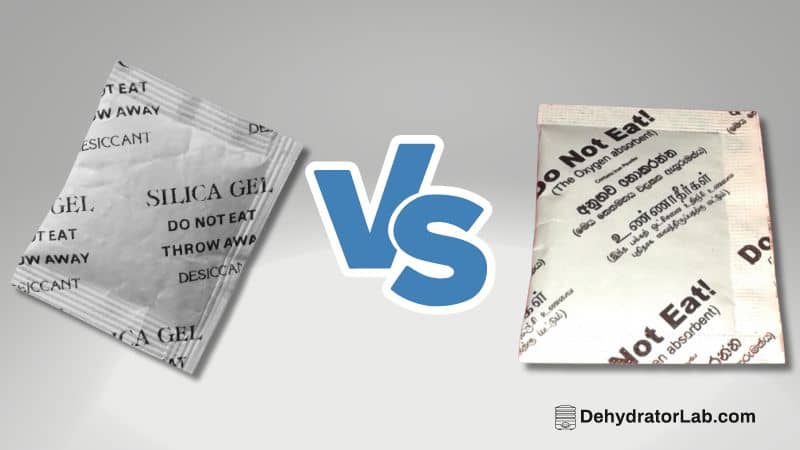
Add an oxygen absorber or a food-safe desiccant pack if you live in a humid climate. Keep containers away from heat sources like ovens or sunny windows so flavor stays bright. Use clean, dry scoops to remove pieces and close lids tightly after every use.
Rehydrate And Use
Cover dried tomatillos with boiling water and sit them for about five minutes for salsa and stews. Blend rehydrated slices with onion, garlic, cilantro, lime, and chiles for a fast salsa verde that tastes like you roasted the fruit. Fold softened pieces into pozole, chicken chili, and green enchiladas for acidity and body.
Grind fully dry slices into tomatillo powder for a tart, savory seasoning that dissolves instantly. Shake the powder into dressings, soups, braises, and rubs for a clean pop of green. Build a taco-night spice blend with tomatillo powder, cumin, coriander, and a pinch of smoked paprika—thank yourself later.
Step-By-Step Guide
Slice And Tray
- Remove husks, scrub off the sticky coating, and pat dry for cleaner slices and trays.
- Halve and cut to ¼ inch thick to balance speed with texture and consistency.
- Line small pieces on mesh or leather sheets so airflow stays steady and nothing slips through.
Dry
- Set the dehydrator to 125–135°F for dependable results and bright flavor.
- Arrange slices in a single layer with slight gaps to prevent case hardening.
- Rotate trays halfway if your unit doesn’t move air evenly, and keep the door closed between checks.
Condition And Store
- Cool slices completely, then jar them two-thirds full and seal the lids.
- Condition for 7–10 days, shaking daily and watching for condensation or clumps.
- Move to airtight storage in a cool, dark pantry once jars pass the no-moisture test.
Troubleshooting
Slices feel tacky after cooling? Extend drying time until the texture tears clean without glossy spots. Pieces stick to trays? Use fine mesh or a light oil spray next time, or choose slightly thicker slices. Batches finish unevenly? Keep thickness consistent and rotate trays halfway.
Sour or off aromas when you open a jar? Discard that batch and review your conditioning step and dryness checks. Powder clumps after a week? Dry longer next time, condition thoroughly, and add a small desiccant pack to the jar.
Tomatillos Vs. Tomatoes
Use this quick snapshot to tune your expectations and set your gear with confidence.
| Topic | Tomatillos | Tomatoes |
|---|---|---|
| Best Temperature | 125–135°F | 140°F |
| Typical Slice | ¼ inch | ¼–½ inch |
| Dryness Target | Dry through, no tacky spots | Dry through, can feel leathery |
| Time Window | Several hours to a long day | 10–18 hours, variety dependent |
| Flavor Outcome | Bright, tart, savory | Sweet, umami, deeper notes |
Ever wonder why tomatillos like a slightly lower temp than tomatoes? The lower range protects color and that citrusy pop while still pushing moisture out. You get a cleaner, greener flavor that shines in salsa and soups without veering into cooked notes.
Safety Notes You Shouldn’t Skip
Skip storing dried tomatillos in oil at room temperature because oil creates low-oxygen conditions that can support dangerous growth. Keep oil-packed mixtures refrigerated and use them within a short window, or freeze them for longer storage. Focus on thorough drying, proper conditioning, and airtight pantry storage for safe, stable results.
Use clean tools and dry hands when you open jars and scoop portions. Replace lids that loosen or crack so containers stay sealed tight. When in doubt, choose the fridge for short-term holding and repack dry when you return to pantry storage.
Flavor Ideas And Meal Prep
Throw a handful of rehydrated tomatillos into the blender with roasted chiles for a 5-minute salsa verde that tastes like you took all day. Crush a few dry slices over soup right before serving for a bright, tart finish that wakes up the bowl. Shake tomatillo powder into vinaigrettes and marinades for pork, shrimp, and grilled vegetables when you want a lift without extra lime.
Build meal-prep kits with labeled jars: flakes for soup, powder for dressings, and slices for salsa. Keep a small jar on the counter for taco night so you can season on instinct. Ask yourself a quick question before you season: do you want tang in the sauce, or lift in the finish?
Pro Tips From The Bench
- Keep the thickness tight and consistent at ¼ inch so the trays finish together.
- Start checking early and cool a test piece before you judge texture.
- Use mesh sheets for small cuts and powder projects so cleanup stays easy.
- Condition for 7–10 days and watch for condensation to protect shelf life.
- Label jars and rotate the oldest forward so you cook through your stock.
FAQs
Can I Dry Whole Tomatillos?
You can, but slices dry faster and more evenly than whole fruit. Whole tomatillos trap moisture in the core and risk surface dryness with wet centers. Slices give you predictable texture and cleaner storage.
Do I Need To Blanch First?
You don’t need to blanch tomatillos before dehydrating. Wash, slice, and dry for simple, consistent results. Blanching adds steps without adding clear benefits here.
Do I Have To Condition?
You get better storage safety and quality when you condition. The process equalizes moisture and flags under-dried pieces before you commit a batch to storage. Treat it like insurance for your pantry.
My Favorite Ways To Use Them
I grind a small batch into tomatillo powder and keep it near the salt so I hit soups and dressings with a quick shake. I rehydrate a bowlful on taco night and blend a near-instant salsa that still tastes fresh. I also toss a few dry slices into green chili to brighten the pot without extra liquid—lazy cook wins, IMO.
You can also use dry flakes like a garnish, which adds texture and a tiny acidity burst to creamy dips. You can pulse flakes with sea salt and a hint of lime zest for a punchy finishing salt. You might even sprinkle that on popcorn because, yes, snack time deserves range.
Quick Workflow Recap
- Set the dehydrator to 125–135°F and slice to ¼ inch.
- Dry in a single layer with tray rotation until no wet centers remain.
- Cool, then condition for 7–10 days and watch for condensation.
- Store airtight in a cool, dark pantry and use clean scoops.
- Rehydrate in boiling water for five minutes or grind into powder for instant seasoning.
Conclusion
You turn tart, green workhorses into a versatile pantry staple when you dry tomatillos at 125–135°F and finish with a solid conditioning step. You save space, sharpen flavor, and speed up cooking because you can rehydrate in minutes or season straight from a jar.
Ready to keep a shaker of tomatillo powder next to your salt and pepper, or do you want a jar of flakes on salsa duty first? FYI, both earn their shelf space 🙂

![Sweet and Spicy Beef Jerky Recipe for Dehydrator [Korean Style]](https://dehydratorlab.com/wp-content/uploads/2023/08/Sweet-and-Spicy-Beef-Jerky.jpg)