Love the flavor of kimchi, but wish it were easier to sprinkle on everything? Dehydrated kimchi flakes are your new secret weapon. They deliver the punch of fermented cabbage—spicy, tangy, garlicky—without the moisture.
You can use them like a seasoning, a crunchy topping, or a base for sauces and rubs. They’re simple to make, shelf-stable, and wildly useful in everyday cooking.
In this article:
Why This Recipe Works
Turning kimchi into flakes concentrates all the flavor while removing moisture, so you get intense taste without sogginess. The low-and-slow drying method keeps the fermented character intact and prevents bitterness.
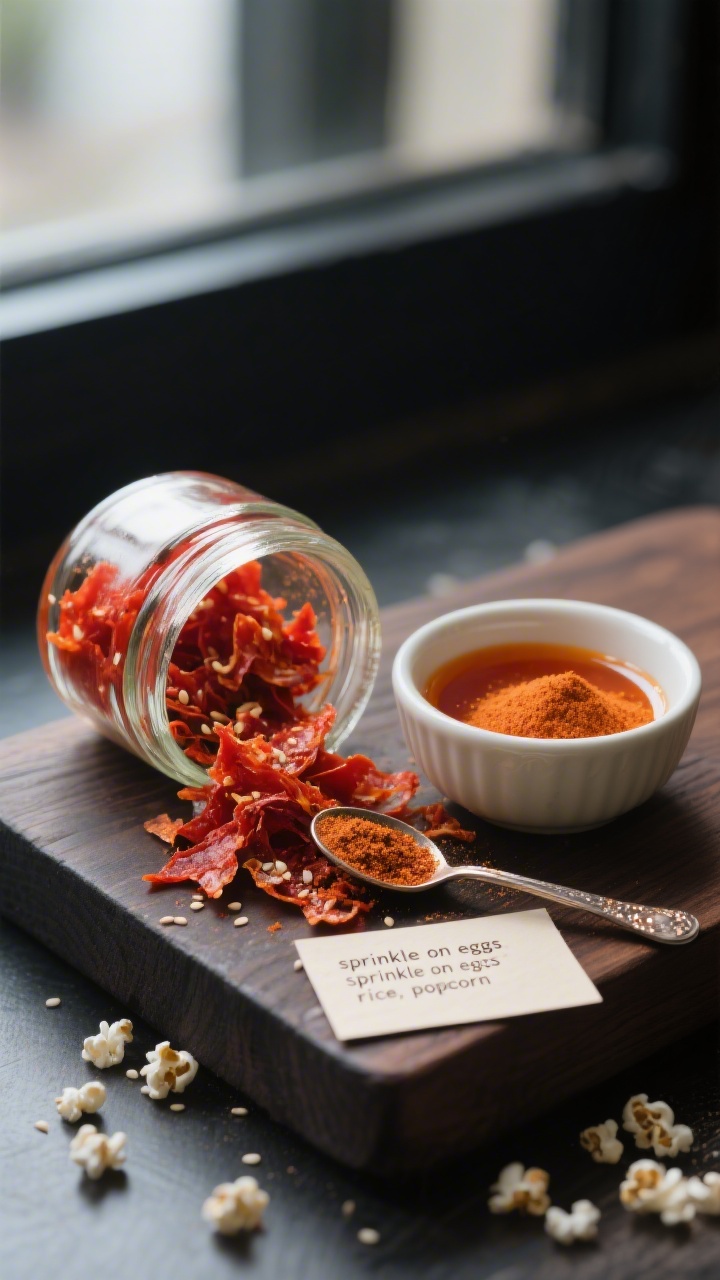
Once dehydrated, the flakes become a flexible pantry staple you can sprinkle onto noodles, eggs, rice bowls, soups, and even popcorn. It’s a zero-waste win too—you can revive older kimchi, use up a large batch, and even separate and dry leftover kimchi brine for a flavorful powder.
Ingredients
- 4 cups well-fermented kimchi (Napa cabbage kimchi works best; squeeze out extra liquid)
- 1–2 tablespoons kimchi brine (optional, for extra flavor or to dry separately into powder)
- 1 teaspoon sugar or honey (optional, balances sharpness)
- 1 teaspoon toasted sesame seeds (optional, for texture and aroma)
- Neutral oil spray (optional, only for oven lining; do not oil the kimchi)
Note: Use store-bought or homemade kimchi. Well-fermented (sour) kimchi gives the boldest flavor, but fresher kimchi works too.
Instructions
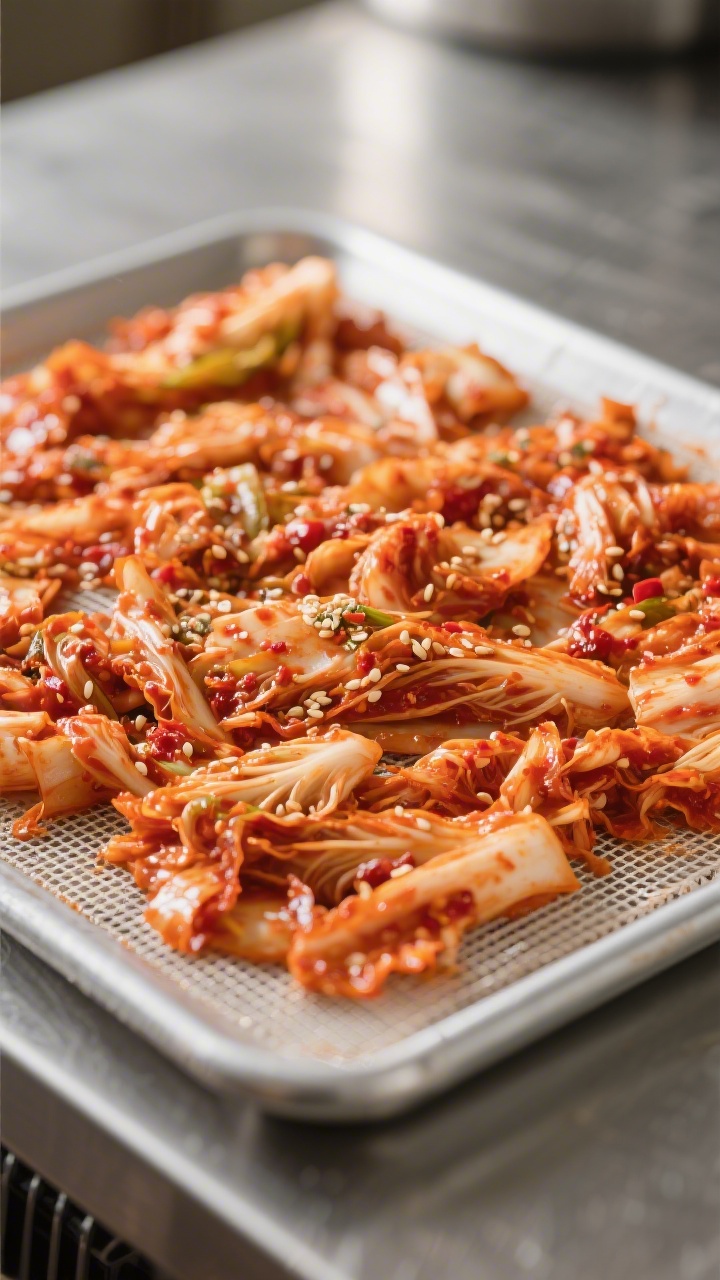
- Prep the kimchi: Drain the kimchi in a colander. Gently squeeze out excess liquid with clean hands or paper towels.
Too much moisture will slow drying and dull the flavor.
- Chop finely: Cut the kimchi into small pieces—about pea-sized. Even pieces dry evenly and crush into uniform flakes later.
- Optional flavor boost: Toss the chopped kimchi with sugar or honey and sesame seeds. This adds a hint of caramelization and nuttiness during drying.
- Set up your dehydrator: Line trays with mesh screens or parchment.
Spread the kimchi in a thin, even layer, without clumps. Set to 125–135°F (52–57°C).
- Or use an oven: Line baking sheets with parchment (lightly oil the parchment if sticking is a concern, but avoid oiling the kimchi). Spread evenly.
Set the oven to its lowest temperature (170–200°F / 75–95°C). Prop the door slightly open with a wooden spoon to allow moisture to escape.
- Dry until crisp: Dehydrate for 6–10 hours in a dehydrator, or 3–6 hours in an oven, depending on temperature, humidity, and thickness. Stir or rotate trays every hour.
The kimchi is ready when it’s dry, brittle, and snaps cleanly.
- Cool completely: Let the dried kimchi cool to room temperature on the trays. This prevents condensation in storage.
- Crush into flakes: Rub the dried pieces between your fingers, or pulse briefly in a food processor. Aim for small flakes, not powder.
If you over-process, sift to remove fine dust.
- Optional brine powder: If you saved kimchi brine, spread it thinly on a lined tray and dry alongside until glassy and brittle. Blend into a fine powder for an umami-packed seasoning salt.
- Jar and label: Transfer flakes to clean, airtight jars. Label with the date and spice level (mild, medium, or hot) if you’re using different kimchi batches.
How to Store
- Airtight container: Store flakes in a glass jar or vacuum-sealed bag to keep out humidity.
- Cool, dark place: A pantry or cupboard away from heat and light preserves color and flavor.
- Use desiccant packs: Add a food-safe silica gel pack to prevent clumping in humid climates.
- Shelf life: 6–12 months for best flavor.
If they soften, re-crisp by dehydrating for 30–60 minutes.
Benefits of This Recipe
- Bold flavor, minimal effort: One ingredient, huge payoff. The flakes are concentrated and versatile.
- Long shelf life: Dehydration reduces waste and clears fridge space.
- Customizable heat: Choose mild or fiery kimchi based on your taste.
- Quick seasoning: Sprinkle over anything for instant depth—no chopping or cooking required.
- Great for meal prep: Travel-friendly, office-friendly, and perfect for camping.
Common Mistakes to Avoid
- Not draining enough: Excess moisture extends drying time and can lead to leathery, uneven results.
- Overcrowding trays: Thick layers trap steam. Spread thinly for crisp flakes.
- High heat: Temperatures above 200°F (95°C) can burn edges and dull the tangy notes.
- Skipping the cool-down: Packaging warm flakes invites condensation and softening.
- Grinding too fine: Powder is useful, but flakes offer better texture and balance.
Recipe Variations
- Gochugaru Boost: Toss the chopped kimchi with 1–2 teaspoons Korean red pepper flakes before drying for extra heat and color.
- Umami Mix: After drying, blend flakes with a little furikake, crumbled nori, or mushroom powder for a ramen-friendly topper.
- Citrus Zing: Mix in finely grated dried orange or yuzu peel for a bright, spicy sprinkle.
- Sweet-Heat Crunch: Add a pinch of brown sugar and toasted sesame seeds post-drying for a snackable, savory-sweet garnish.
- Smoky Version: Stir in a touch of smoked paprika after crushing to layer in gentle smoke without overpowering the kimchi.
FAQ
Will dehydrating kill the probiotics in kimchi?
Some probiotics won’t survive the drying process, especially at higher temperatures.
The flakes retain the signature tangy, fermented flavor, but they’re not a reliable source of live cultures. If you want probiotics, enjoy fresh kimchi as well.
Can I use radish kimchi or other types?
Yes. Kkakdugi (radish kimchi) works, but it takes a bit longer to dry because the cubes are dense.
Slice them thinly before dehydrating for even results. Cucumber or green onion kimchi can also be used, though flavors may mellow.
Do I need a dehydrator?
No. A low oven works well.
Keep the temperature as low as possible and crack the door to help moisture escape. Rotate trays for even drying.
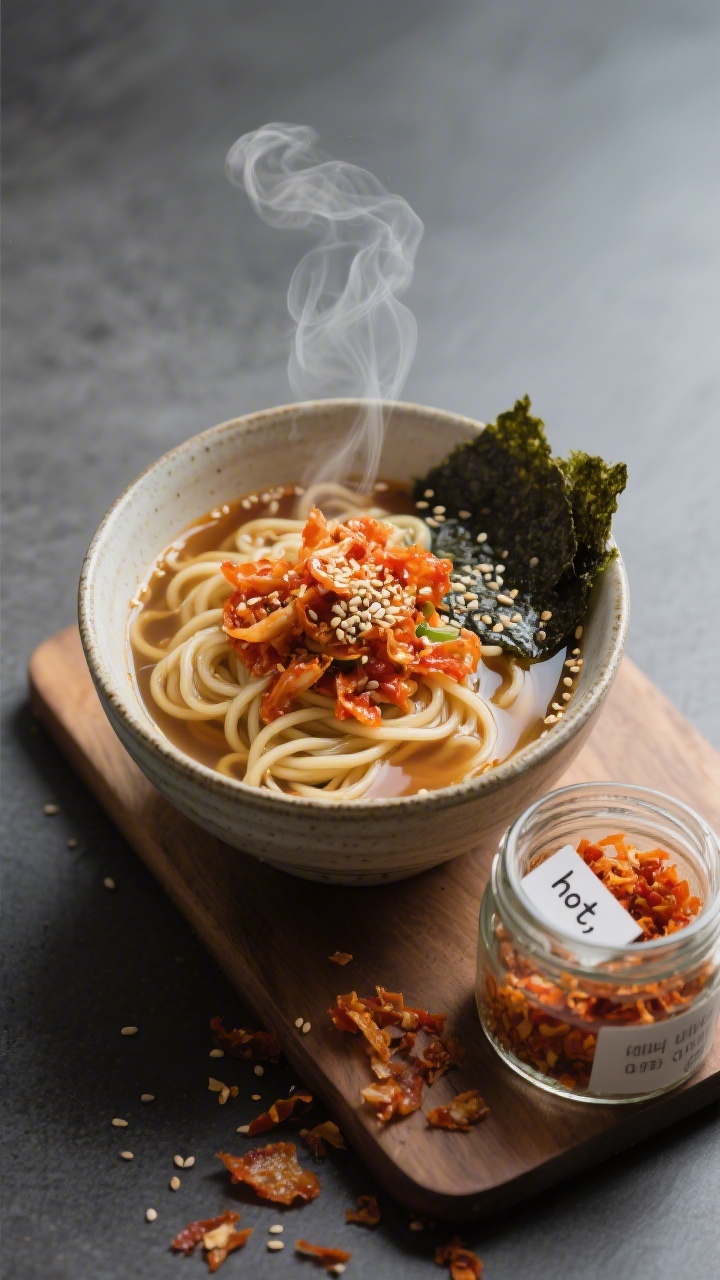
How do I use dehydrated kimchi flakes?
Sprinkle over eggs, ramen, avocado toast, pizza, fried rice, roasted veggies, or grilled meats. Stir into mayo or yogurt for a quick sauce.
Mix into breadcrumb coatings, popcorn, or compound butter for a savory kick.
Can I rehydrate the flakes?
Yes. Soak in hot water or broth for 5–10 minutes until softened. Use in dumpling fillings, stews, or stir-fries when you want the flavor without extra chopping.
Why are my flakes chewy?
They likely weren’t dried long enough or were stored before fully cooled.
Return them to the dehydrator or oven until crisp, then cool completely before sealing.
Is it too salty to season with?
Kimchi varies in saltiness. Start with a light sprinkle and adjust. If your batch is very salty, mix flakes with neutral add-ins like toasted sesame seeds or a pinch of sugar to balance.
How much kimchi makes how many flakes?
As a rough guide, 4 cups of chopped, drained kimchi yield about 1 to 1.5 cups of flakes, depending on moisture content and how finely you crush them.
In Conclusion
Dehydrated kimchi flakes pack huge flavor into a tiny jar.
They’re easy to make, easy to store, and instantly elevate simple meals. Whether you’re seasoning noodles, topping eggs, or crafting a rub for grilled meat, these flakes add heat, tang, and depth with zero fuss. Keep a jar on hand, and you’ll find yourself reaching for it every day.

Dehydrated Kimchi Flakes – Spicy, Tangy, and Incredibly Versatile
Ingredients
- 4 cups well-fermented kimchi (Napa cabbage kimchi works best; squeeze out extra liquid)
- 1–2 tablespoons kimchi brine (optional, for extra flavor or to dry separately into powder)
- 1 teaspoon sugar or honey (optional, balances sharpness)
- 1 teaspoon toasted sesame seeds (optional, for texture and aroma)
- Neutral oil spray (optional, only for oven lining; do not oil the kimchi)
Instructions
- Prep the kimchi: Drain the kimchi in a colander. Gently squeeze out excess liquid with clean hands or paper towels.Too much moisture will slow drying and dull the flavor.
- Chop finely: Cut the kimchi into small pieces—about pea-sized. Even pieces dry evenly and crush into uniform flakes later.
- Optional flavor boost: Toss the chopped kimchi with sugar or honey and sesame seeds. This adds a hint of caramelization and nuttiness during drying.
- Set up your dehydrator: Line trays with mesh screens or parchment.Spread the kimchi in a thin, even layer, without clumps. Set to 125–135°F (52–57°C).
- Or use an oven: Line baking sheets with parchment (lightly oil the parchment if sticking is a concern, but avoid oiling the kimchi). Spread evenly.Set the oven to its lowest temperature (170–200°F / 75–95°C). Prop the door slightly open with a wooden spoon to allow moisture to escape.
- Dry until crisp: Dehydrate for 6–10 hours in a dehydrator, or 3–6 hours in an oven, depending on temperature, humidity, and thickness. Stir or rotate trays every hour.The kimchi is ready when it’s dry, brittle, and snaps cleanly.
- Cool completely: Let the dried kimchi cool to room temperature on the trays. This prevents condensation in storage.
- Crush into flakes: Rub the dried pieces between your fingers, or pulse briefly in a food processor. Aim for small flakes, not powder.If you over-process, sift to remove fine dust.
- Optional brine powder: If you saved kimchi brine, spread it thinly on a lined tray and dry alongside until glassy and brittle. Blend into a fine powder for an umami-packed seasoning salt.
- Jar and label: Transfer flakes to clean, airtight jars. Label with the date and spice level (mild, medium, or hot) if you’re using different kimchi batches.
Related reading: dehydrated hummus powder, how to make watermelon, and dehydrator reviews.
Printable Recipe Card
Want just the essential recipe details without scrolling through the article? Get our printable recipe card with just the ingredients and instructions.