In this article:
How to Dehydrate Peaches in a Food Dehydrator
So, you’ve found yourself with a mountain of beautiful, ripe peaches, and you’re hit with that familiar panic. You can’t possibly eat them all before they turn into a fuzzy, science-project mess.
Been there, stared down that fruit bowl. You could make jam, but let’s be real, that’s a sticky, hot, and frankly ambitious endeavor for a Tuesday afternoon.
What if I told you there’s a way to preserve that sweet, summery sunshine without turning your kitchen into a wartime canning operation? Dehydrating peaches is where it’s at. It’s my absolute favorite way to capture the season. You end up with these incredibly flavorful, chewy gems that are perfect for snacking, hiking, or tossing in your morning oatmeal.
It’s surprisingly simple, and I’m going to walk you through it, step-by-step. No fancy culinary degree required, just you, your dehydrator, and a pile of peachy potential.
Why Bother Dehydrating Peaches? (Spoiler: It’s Awesome)
Why would you choose dehydration over other methods? IMO, it’s all about the result. Freezing takes up valuable real estate in your icebox, and canning, while wonderful, feels a bit more high-stakes. Dehydrating? It’s the chill, low-energy cousin of food preservation.
You concentrate the flavor into an intense, candy-like treat. You’re basically making your own natural fruit snacks, without the weird artificial colors and a price tag that would make a billionaire blush. Plus, they’re lightweight and don’t need refrigeration, making them perfect for lunchboxes, road trips, or your emergency preparedness kit.
Ever had a peach so perfect you wished you could save it forever? This is how.
This Is What You’ll Need
Before we get our hands sticky, let’s talk gear. You don’t need a ton of equipment, but having the right stuff makes the process smooth sailing.
The Non-Negotiable Tools
- A Food Dehydrator: This is the star of the show. I use a simple stackable model with a fan on the top. It wasn’t expensive, and it’s been chugging along faithfully for years. If you have one with a rear-mounted fan, even better—it often provides more even drying.
- Sharp Knife & Cutting Board: A sharp paring or chef’s knife is crucial for safety and clean slices. A dull knife will mash the peach instead of cutting it. Not ideal.
- Large Bowl: For your pretreatment dip (more on that soon).
- Spoon or Peeler: For peeling the peaches. I have a strong preference here, which I’ll share in a sec.
The Ingredients (It’s Not Complicated)
- Fresh Peaches: The number one most important ingredient. I’ll yell it from the rooftops: start with good fruit. You can’t dehydrate mediocrity into magnificence.
- Acidic Bath Component: This is your color-saving hero. You can use:
- Lemon Juice (my go-to)
- Citric Acid (aka “sour salt,” found in the canning aisle)
- Fruit-Fresh (a commercial product designed for this)
- Water: For diluting your acidic bath.
See? Told you it was simple.
The Peach Prep: Your Road to Perfect Slices
This is where the magic—and a little bit of the mess—happens. Follow these steps, and you’ll have trays of evenly sliced peaches ready for their transformation.
Step 1: Choosing and Washing Your Peaches
Go for peaches that are firm-but-ripe. You want them to give slightly to pressure but not be a mushy, bruise-ridden mess. Overripe peaches will turn into a sticky, shapeless puddle in the dehydrator. Underripe ones won’t have any flavor. It’s a Goldilocks situation.
Give them a good rinse under cool water to remove any dirt or… well, whatever’s on there. Pat them dry.
Step 2: To Peel or Not to Peel?
This is a hot debate in the dehydrating world. The peach skin can get a little tough and leathery when dried. I always peel my peaches for a superior, melt-in-your-mouth texture. It’s an extra step, but 100% worth it.
You have two main options:
- Blanching (My Preferred Method): This sounds fancy, but it’s just a quick hot tub and ice bath for your fruit. Score a small “X” on the bottom of each peach. Drop them into boiling water for about 30-45 seconds, then immediately plunge them into a bowl of ice water. The skins will slip right off with your fingers or a spoon. It’s wildly satisfying.
- Using a Peeler: A good Y-style peeler works, but it can be a bit wasteful on the flesh. If you only have a few peaches, this is a viable option.
If you’re feeling lazy or don’t mind a chewier texture, you can skip peeling. No judgment here 🙂
Step 3: Pitting and Slicing Like a Pro
Cut the peach in half along the seam, twist, and remove the pit. Easy. Now, for slicing.
Consistency is key. You want all your slices to be about the same thickness so they dry at the same rate. I aim for 1/4 to 1/2-inch thick slices. Any thicker, and they take forever to dry; any thinner, and they can become brittle and over-dried.
You can do halves, slices, or even dice them for future muffin mixes. For general snacking, uniform slices are the way to go.
Pretreating Your Peaches
Okay, ever pulled a dehydrated peach out of the pantry and found it’s turned a sad, unappetizing shade of brown? We can prevent that. This step is non-negotiable if you want pretty, bright orange peaches.
The Acid Bath
This quick dip prevents oxidation (that technical term for browning). It’s like a spa treatment for your fruit slices.
For every 4 cups of water, add 1 cup of lemon juice. Or, you can use 1 tablespoon of citric acid dissolved in 1 quart of water. Give it a stir.
Place your peach slices in the bowl for about 3-5 minutes. You don’t need to soak them for hours; just a quick dunk does the trick. Pull them out, let the excess liquid drip off, and arrange them on your dehydrator trays. This little bath makes a world of difference in the final product’s color and, I swear, helps preserve that vibrant peach flavor, too.
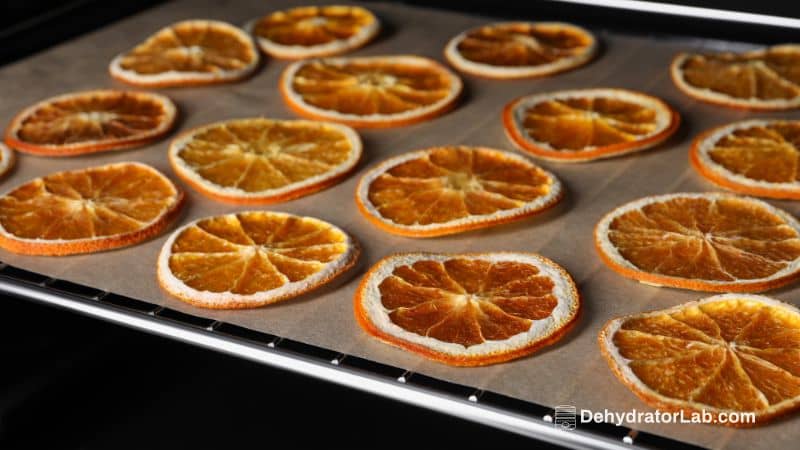
Dehydrator Time: Playing the Waiting Game
The prep is done. Now, we let the machine do its thing. This is the easy part.
Loading the Trays
Spread your peach slices in a single layer on the dehydrator trays. Make sure they aren’t touching or overlapping. The air needs to circulate around each piece freely. If you crowd them, you’ll get steaming, not drying, and that’s a one-way ticket to Mold City.
Setting the Time and Temp
Here’s the sweet spot I’ve found after many, many batches:
- Temperature: Set your dehydrator to 135°F (57°C).
- Time: This will vary, but expect it to take 6 to 12 hours.
Why the huge time range? It depends on a few things:
- The thickness of your slices.
- The humidity in your house (a rainy day takes longer).
- The juiciness of the peaches.
- How many trays you have loaded.
You can’t really set it and forget it. You need to check for doneness.
How to Tell When They’re Done (The Fun Part)
You’re looking for a leathery, pliable, but not sticky texture. A perfectly dehydrated peach slice should bend without cracking, and it shouldn’t feel tacky or wet to the touch. If you tear it in half, you shouldn’t see any beads of moisture.
Take a piece off the tray, let it cool completely (a warm peach will always feel softer), and then test it. If it’s still too moist, just pop the trays back in. No big deal.
Over-drying can make them brittle and crunchy. Still edible, but not the chewy perfection we’re aiming for. Under-drying, however, can lead to spoilage. So, when in doubt, dry it out a little more.
The Final Step: Conditioning and Storage
You didn’t just spend all this time to have your peaches spoil in a week! This final step ensures your hard work pays off for months to come.
Conditioning Your Peaches
“Conditioning” is just a fancy word for making sure the moisture level is even across all your pieces before you seal them up for long-term storage.
- Let the peach slices cool completely.
- Loosely pack them into large glass jars or plastic containers, filling them about 2/3 full.
- Shake the jars daily for about a week.
Why do we do this? Any residual moisture in a few pieces will redistribute evenly among the drier pieces. If you see condensation forming on the inside of the jar after a day or two, you know you need to put them back in the dehydrator for a bit. It’s a brilliant little safety check.
Storage Solutions for the Long Haul
Once conditioning is done, pack your peach slices for their long nap.
- Use Airtight Containers: Mason jars, vacuum-sealed bags, or heavy-duty freezer bags with the air squeezed out work great.
- Store in a Cool, Dark, Dry Place: Your pantry or a cupboard is perfect.
- Label Them! Trust me, you’ll forget what’s in that jar by next summer. Write “Dehydrated Peaches” and the date on a piece of tape.
Stored properly, your peaches will stay delicious for 6 months to a year. But let’s be honest, they’ll probably disappear long before that.
And there you have it! You’ve just transformed a fleeting summer bounty into a shelf-stable treat that will remind you of sunny days in the dead of winter. The whole process is really more about patience than skill. You’ve got this!
Now, go forth and dehydrate! Your future self, desperately searching for a healthy snack at 3 p.m., will thank you. Seriously, it’s a game-changer.