The manual meat grinder is not a kitchen appliance that was only used many years ago. In fact it is used today in almost every kitchen. This handy device allows users the ability to create and controls all meats. See our take on best manual meat grinder on our review page.
A manual meat appliance is not assembled when you remove it from the box, and many people that purchase the manual grinder don’t expect or understand how to assemble this device.
In this article:
How to Assemble a Manual Meat Grinder in 8 Easy Steps

Assembling the appliance is very easy to do if you follow the instructional steps, which include:
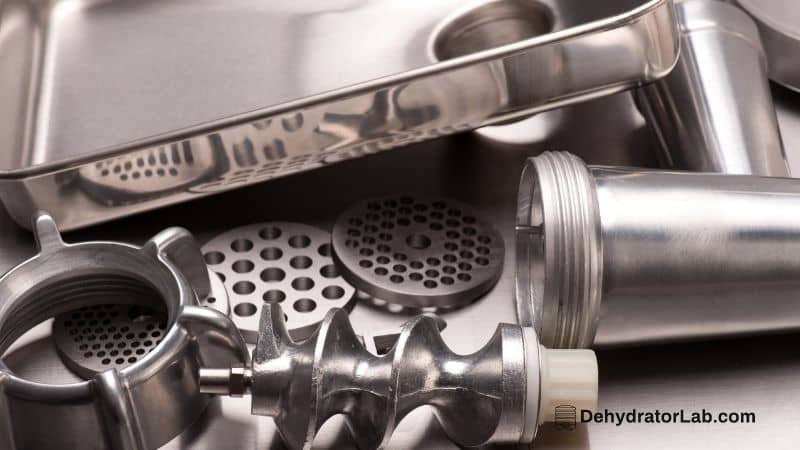
1. Inspect The Device
It is a good idea if you get familiar with the parts of the grinder. The parts would include the grinding plate, locking ring, eye screw, clamp, hopper, handle, and the auger. The parts could vary as there are many different brands that can be purchased.
2. Where To Install The Device
The device will need to have a 1 to 1 ½ inch table top or counter top to mount the appliance onto. The tabletop or countertop must be sturdy and stable so the appliance will not move when you are grinding.
3. Check The Parts
Even if this is the first time to be using the manual appliance you should always check out the parts. The parts should be clean and dry. There should be no rust on the parts.
The cutting blades should be sharp and not dull. If the parts are not clean, then wash the parts with warm soapy water. The parts should be dried thoroughly, then take cooking oil and lightly coat the parts.
4. Place Handle Into The Grinder Body
Take the handle, then firmly place the handle into the appropriate slot on the body of the device. When the handle is in the slot then it should turn without any problems as this will let you know that the handle installed properly.
Seeing this will allow that the handle isn’t turning properly and it tends to rub on the body sides, then remove the handle and reinsert it as the handle should freely turn without any rubbing.
5. Adding The Auger
Take the auger, which looks like a screw. The auger should be located on the body of the appliance, but depending on the model it could be located out of the handle. The auger should be inserted and it should firmly secure to the body of the appliance. The job of the auger is holding the cutting blades on firmly.
6. Adding The Cutting Blades
Take the cutting blade and slide it onto the auger, then add the grinding plate. The grinding plate is chosen by the operator as it will determine the thickness of your meat. Once the grinding plate is attached by a wing nut firmly, then it is attached properly to the device.
7. Mount And Attach The Grinder To Tabletop Or Countertop
The tabletop or countertop that the operator will be mounting the grinder to should be at least one inch thick or one ½ inch thick. Take a wedge and place it on the tabletop or countertop, then firmly turn until the device is attached and secure. The device should not move at all while you are using it, so it is very important that it attached and secured properly.
Take A Test Run
Turn the handle on the device several times to make sure that the device doesn’t budge or move. The handle should turn easily and there shouldn’t be any resistance with the handle. Once you have tested the device and it seems that is working properly, then you are ready to use your appliance.
That is how easy it is to assemble the manual meat grinder. Once you have done the assembly process a few times, the assembly process will get shorter.
Best Sellers – Manual Meat Grinders


Disassemble The Manual Meat Grinder
It is very important to disassemble and clean the device immediately after each use. Leaving raw meats on the device can attract bacteria. Here are the steps to disassembling the device:
1. Helpful Trick
This first step isn’t essential, but it can make the cleaning easier for you. Take two slices of bread (any kind) and run it through the device. The bread will remove any meat that is attached to the parts and body of the device.
2. Unclamp The Device
Unclamp the device from the tabletop or countertop, then remove the device. Remove the cutting blades and the grinding plate. The auger will need to be removed next, then remove the handle.
If the cutting blades and grinding plate are wet and slippery, then you can take a paper towel to dry them, so you can remove them easier.
3. Wash The Parts
First, check to see if the parts are dishwasher safe because many parts are not recommended for the dishwasher. Wash each part in warm soapy water, then rinse thoroughly.
Make sure that the cutting blades and grinding plate are free from all meats and juices. You can even use a toothbrush on these parts to provide a thorough cleaning, then continue to wash the rest of the body.
4. Drying The Parts
Drying the parts of the device is one of the most important steps. Don’t let the parts air dry as they should be dried thoroughly with a soft cloth. Doing this will keep the parts from rusting and discoloring.
5. Storing The Device
After all the parts are dried, then take food grade oil and spray each part. You don’t need to drench the parts with the oil, but just enough to keep the parts from rusting. The parts can be stored in the freezer or in a dry and cool area.
The grinding blades can be wrapped in soft clothes, then put away. The soft cloth will keep the grinding blades from rubbing each other, which could dull the cutting blades.
This is how easy it is to disassemble and clean the manual meat grinder and parts.
Helpful Tips
- Always wash all the parts of the device before you use it even if you have used the device before. Washing the parts before you use them will always keep the parts clean and maintained along with keeping all bacteria away.
- Always handle the grinding plates and cutting plates with added care. They are very sharp.
- Always use food grade oil on the parts to prevent rust from occurring.
- Never use any kind of tool or object to push the meat into the appliance. Doing this will only damage the device.
- If you have the freezer space, then it is good to store the grinder and parts in the freezer. This parts and body of the device will actually work better if it has been stored in the freezer. The coldness allows the meat to grind easier and the meat won’t stick to the parts. If you don’t have the space to store the appliance in the freezer, then you can put it in the freezer an hour prior to when you will be using it.
- Chill the meat that you will be using in the freezer for thirty minutes to an hour prior. This will assist in grinding the meat, and the meat will be very cold while you are working with it, which adds safety.
- Use two slices of bread after each use as the bread will remove all meat and fat that may be built up inside of the body parts of the grinder.
- Meat can become tenderer if you grind the meat twice. You will not want to do this with lamb, but all other meats can be grounded twice for added tenderness.
- Cutting the meat that you will be using into smaller pieces will allow the grinding process to go quicker. The meat pieces should be cut into one to two inches.
- If the handle starts to become harder to turn, then simply loosen the screw, which would be located on the opposite end of the auger.
- Never store the appliance near water. Water can corrode the appliance. The appliance should be stored in a cool, dry place where there is no water source near the appliance.
- Always read the manual instructions thoroughly. The manual will give you all the important information about the model of your appliance and how to use it properly.
- Always place a dish underneath the grinder spout to catch the meat or vegetables that you are grinding.
- The grinding blades are very sharp, which is why you should take precaution when handling the blades. Remember, the grinding blades are meant to cut through all types of meat and they are very sharp and dangerous.
- A manual meat grinder should be used regularly. This will keep the cutting blades sharp and prevent you from buying new blades often.
- All meat should be washed before grinding it. Don’t wait to wash the meat after you have diced the meat into smaller pieces as this will remove the nutrients from the meat.
- When washing the device with soap and water make sure the soap is an antibacterial soap. Doing this will also eliminate any germs and bacteria.
- If you have to disassemble the device in the middle of grinding, then it is very important that you take the parts and place them into ice cold water before you assemble the device again. If you don’t, then the parts will be warm and grinding warm meat is not a safe temperature.
- A manual meat grinder is not for everyone. Always keep in mind that anyone using it will need to have enough strength to turn the handle and push and press the meat thru the device. If you don’t think you have the strength, then you can consider purchasing an electric device that will do most of the work for you.
Using a manual meat grinder is not hard to do. With the proper steps and care the appliance will repay you back by providing you with delicious sausages, hot dogs, meats, and other tasty creations.
The manual book that comes with the appliance should be read carefully as not all of the appliances are the same. Everyone should always use the proper safety precautions when using the device.
To keep the appliance working properly you should always clean and maintain all the parts each time the appliance is used. After you use the appliance several times it will become easier to use and everyone will be thrilled with the outcome of the things that you have created.
Meat Grinder Safety
Assembling the appliance is just one of the important steps that will need to be done before you start creating delicious sausages, meatballs, and dishes. Like with any other appliance that you use in your kitchen, you should know all the safety measures too.
This will not only prolong the life of the appliance, but it will keep you safe when you are operating the device. The safety tips are provided below:
1. Read The Instruction Manually Completely
Too many times when consumers purchase an appliance they disregard the instruction manual. The instruction manual was added with the appliance because it is very important that it is read completely. The instruction manual will be approximately four to five pages, so it doesn’t take too much time to read it.
The manual will explain easily how to assemble the appliance and to use it properly. There will also be safety precautions in the instruction manual, which will keep all operators safe when you are operating the appliance along with the meats that will be grounded. Always read and follow the instruction manual, then the appliance will last the owner for many, many years.
2. Never Use The Meat Grinder Near Water
This safety tip may seem like a common-sense tip, but there are people that set up their appliance next to a sink full of water. Anytime there is water near the appliance, then you pose the risk of the appliance’s internal parts being affected.
Also, the grinder shouldn’t be set up near the stove or any heating source. The heat can damage the internal parts of the appliance too.
3. Always Keep The Appliance Clean And Sanitized
If you want your appliance to last, then it must always keep it clean and sanitized. Read the instruction manual to make sure if the parts of your appliance are dishwasher safe. Many of the parts are not safe for the dishwasher and they must be washed by hand.
The grinder should be washed thoroughly after each use. Don’t wait to clean the device. Always clean it as soon as the grinding is completely done. All of the parts must be dried thoroughly, then stored away properly. You don’t want the parts to get rusty, moldy, or mildewed for not drying the parts properly.
4. Choose The Right Meat Grinder For You
If you have decided that you want one of these appliances, then try to figure out which type you need. You can purchase the manual device or the electric one. The manual device is operated by a hand crank that you will be cranking and the electric one will grind the meat for you as it will need to have it fed the meat through the feeding tube.
If you are new to grinding, then you may want to consider the manual one to see if you are going to enjoy using it, then you can always upgrade to an electric model.
5. Make Sure The Appliance Is Secured
When the participant is installing and assembling the manual meat grinder you will want to make sure it is secure on the countertop or tabletop. You don’t want the appliance moving about when you are in the middle of grinding meat.
6. Enjoy Your Meat Grinder
The last thing is to enjoy using your meat grinder. As you can see it is easy to use and in no time at all, you will be creating fresh burgers, sausages, meatballs, and other tasty dishes.
Conclusion
You just learned how to assemble a manual meat grinder which is very easy to do. The first time you start to assemble it make sure you take your time so all the parts are put into place properly. After the first assembling, you will be able to assemble the device within a few minutes and you will be on your way to grinding your meats. If you come across a problem, then you can always refer to the instruction manual that came with your device.
If you have just bought your meat grinder, you will be on your way in just minutes to making healthy, fresh, and tasty meat creations.
Remember, be good to your appliance and it will be good to you! It will pay you back by providing you with the best meat dishes that will have your friends and family asking: “What is your secret?”.