In this article:
Dehydrated Potatoes: Easy Step‑by‑Step Guide + Pro Tips
Craving pantry‑ready potatoes that cook fast, taste great, and don’t hog freezer space? You can dehydrate potatoes at home with simple tools, reliable temps, and a few no‑nonsense tricks that make every batch crisp, clean, and long‑lasting.
I run big batches during harvest and small ones before busy weeks, and the payoff always feels like meal‑prep magic. Ready to stock your shelves and skip the last‑minute peeling panic?
Why Dehydrate Potatoes
You save space, reduce waste, and speed up weeknight cooking when you add dehydrated potatoes to your pantry routine. The dehydrator pulls out moisture so microbes can’t party, and you keep rich, potato flavor ready for soups, hashes, casseroles, and camping meals.
You get flexible cuts – slices, shreds, or diced – that rehydrate fast and cook like a dream.
The Best Potatoes And Cuts
You can use most white or yellow potatoes and get an excellent texture if you cut them evenly. I reach for starchy types when I want fluffy rehydration and waxy types when I want shape that holds in soups. Keep your knife work consistent so every tray dries at the same pace and nothing lags.
- Slices: aim for 1/8‑inch for scalloped‑style layers and fast rehydration.
- Shreds: cut to matchstick or shoestring size for hash browns that crisp fast.
- Dice: go small so soup‑ready cubes hydrate evenly and soften on schedule.
Each cut brings different use cases, so match your plan to your prep and keep your sizes uniform for even drying.
Gear Check
You only need a dehydrator with a thermostat, a large pot, a colander, a sharp knife, and airtight containers. I prefer dehydrators with a fan and adjustable heat because they dry consistently and save time. You can use mesh inserts for shreds so tiny bits don’t fall through the racks.
- Dehydrator: look for steady 125–140°F settings and reliable airflow.
- Pot and colander: set up a blanching station that moves quickly.
- Containers: stash dried potatoes in glass jars or quality bags with good seals.
Add labels with dates so you rotate smartly and always grab the older first.
My Go‑To Workflow (Step‑By‑Step)
You don’t need fancy tricks here – just a clean process and an eye for consistency. Ever wonder why some batches brown or bend instead of snap? The secret lies in blanching and spacing.
Wash, Peel, And Cut
Scrub potatoes well to remove dirt and eyes. Peel for a cleaner look or keep skins if you like rustic texture. Cut evenly: 1/8‑inch slices, fine shoestrings, or small dice for soups, and keep batches manageable so your blanching water doesn’t cool down too much.
- Keep a cold‑water bowl nearby to hold cut potatoes briefly.
- Work in small batches so cuts stay consistent and color stays bright.
- Aim for clean edges and consistent thickness for predictable drying.
Blanch Like You Mean It
Blanching stops enzymes, locks color, improves texture, and shortens both drying and rehydration time. You win on every front when you nail this step, so don’t rush it.
- Boiling water blanch: add potatoes, return to a full boil, then time 5–6 minutes.
- Steam blanch: go about 6–8 minutes if you prefer a gentler approach.
- High elevation? Add a minute or two as needed so pieces turn translucent.
Start your timer after the water returns to a boil so you avoid under‑processing and keep color bright.
Chill Fast and Dry the Surface
Shock blanched potatoes in ice water to stop carryover heat. Drain well in a colander and pat dry with clean towels so pieces don’t steam on the trays. Dry surfaces speed the cycle and help you avoid rubbery edges.
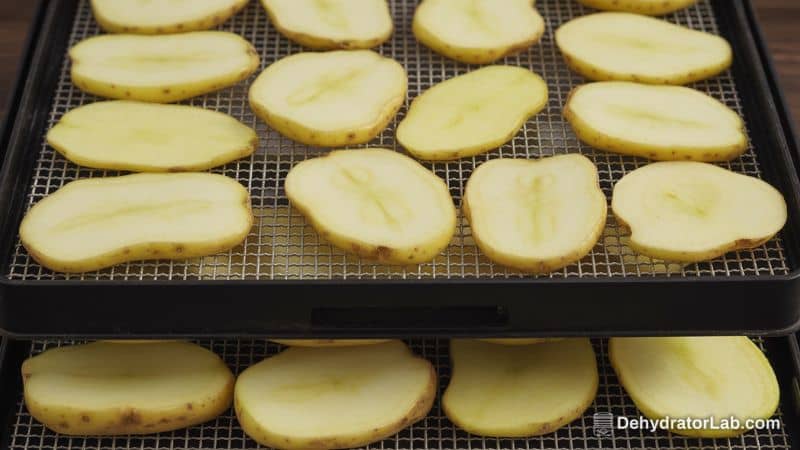
- Spread pieces in a single layer on trays with no overlap.
- Keep edge‑to‑edge spacing so airflow hits every surface.
- Load trays evenly so you reduce the need for fussy tray rotations.
Dehydrator Settings That Work
Set your dehydrator to 135–140°F for vegetables and let steady airflow do the heavy lifting. I preheat for a few minutes so the trays enter a stable environment and moisture moves out quickly. If your machine dries hotter than set, offset a few degrees and watch the first batch closely.
- Slices: check early and often after hour 6.
- Shreds: expect faster times with good spacing.
- Dice: plan on the longer end depending on size and humidity.
Consistency beats speed here, so favor steady heat over cranking temps high.
How Long Do Potatoes Take
Plan on 6–12 hours depending on cut, humidity, and load. Thin slices finish first, shreds usually sit in the middle, and dice run toward the longer end. Start checking at hour six so you remove early finishers while thicker pieces keep going.
- Clear look: pieces shift from opaque to translucent.
- Firm feel: finished potatoes snap or break without bending.
- No bend: if anything flexes, keep drying and recheck soon.
Remove finished trays as they complete, so you don’t over‑dry the early ones and turn them into potato pebbles.
The Dryness Test You Can Trust
You want hard, dry, crisp‑brittle pieces that snap when you break them. Slices should crack cleanly, shreds should break without effort, and dice should feel firm through the center. If anything bends, it still holds moisture, so give it more time and retest with a fresh piece.
- Test multiple trays to confirm the whole batch.
- Break a few pieces in the middle, not just the edges.
- Cool a sample for a minute before you judge the final texture.
Storage That Actually Lasts
Let trays cool completely to avoid trapped condensation. Pack into airtight containers like gasketed glass jars or freezer‑grade bags, then store in a cool, dark place. You extend shelf life dramatically when you limit heat, light, and humidity.
- Pantry: cool and dark for several months of quality.
- Cool room: up to a year if you keep temps around 60°F.
- Fridge or freezer: extra insurance if your kitchen runs warm.
Check jars during the first week for any fogging or clumping, and return the batch to the dehydrator if you spot moisture. Aim for bone dry every time.
Rehydration That Makes Cooking Easy
Cover dried potatoes with cool or hot water and soak until tender—usually 30–120 minutes, depending on cut. Use the soaking liquid in your dish to keep the potato flavor and starch, which helps the body. For soups and stews, throw dried pieces straight into simmering broth and cook until tender.
- Quick math: 1 cup dried yields roughly 2 cups rehydrated.
- For hash: soak shreds, squeeze dry, then crisp in hot oil.
- For gratin: soak slices until flexible, then layer and bake.
I love how predictable rehydration feels when I keep cut sizes consistent and match the method to the recipe.
Use Cases You’ll Cook On Repeat
Skillet Hash And Breakfast Bowls
Rehydrate shreds, squeeze out excess water, and fry in a hot pan with oil until golden. Season as they crisp, add onions and peppers, and slide eggs on top if you want weekend‑brunch energy on a Tuesday. You get crunchy edges, tender centers, and that savory potato hit without peeling at 7 a.m.
- Dry thoroughly so oil doesn’t sputter.
- Press gently with a spatula for even browning.
- Finish with herbs, hot sauce, or a little cheese.
Soups, Stews, And Chowders
Drop diced dried potatoes straight into simmering broth and let them plump as you build layers with aromatics and herbs. The starch adds body, so you often skip extra thickeners and still land cozy, spoon‑worthy bowls. I keep a jar near the stove and toss in a handful whenever a soup needs heft.
- Add early if you want a softer texture.
- Add later if you want a firmer bite.
- Adjust salt after they hydrate and release starch.
Scalloped Or “Au Gratin” Style
Soak slices until flexible, then layer with a seasoned sauce and bake until bubbly. You get neat stacks, even texture, and a faster start than slicing raw every single time. I love how dried slices hydrate uniformly and hold clean layers when you cut portions.
- Par‑soak in hot liquid to speed bake time.
- Keep layers thin for an even set.
- Rest before slicing for clean edges.
Troubleshooting And Pro Tips
Browning During Drying
You likely under‑blanched or skipped a rapid chill. Fix your blanch time, chill in ice water, and pat dry before trays. Start the blanch timer only after the water returns to a full boil, so you keep things consistent and lock in color that doesn’t fade.
- Batch small so water holds the boil.
- Use a big pot for stable heat.
- Dry surfaces before trays for better color.
Chewy Centers Or Bendy Pieces
You probably overlapped on trays or ran temps too low. Space pieces cleanly, run 135–140°F, and rotate trays if your machine dries unevenly. Test middle pieces, not just edges, before you call the batch done.
- Break pieces to check centers.
- Remove finished trays early.
- Favor consistency over speed.
Storage Issues Or Condensation
You likely packed warm or not‑quite‑dry pieces. Let everything cool fully, then seal. If you see condensation, return the batch to the dehydrator and finish to a crisp‑brittle snap.
- Use airtight containers.
- Store cool, dark, and dry.
- Label with date for rotation.
Dehydrator Comparisons That Matter
Temperature Control And Airflow
Models with a thermostat and a fan dry faster and more evenly, which reduces checking and saves you from half‑done middle trays. Horizontal airflow spreads heat across racks nicely, and vertical units shine when you rotate trays during long runs. Both styles work if you manage spacing and keep your temps steady.
- Look for a 125–160°F range.
- Favor sturdy trays and good seals.
- Add mesh screens for shreds.
Timers And Convenience Features
Built‑in timers, auto‑off, and simple controls keep long vegetable cycles worry‑free. Fruit leather trays catch small bits, and fine mesh keeps shoestrings from slipping through. A clear door helps you check progress without losing heat every ten minutes.
- Use auto‑off for evening runs.
- Preheat for consistent starts.
- Keep a notebook for settings.
FAQs Quick Hits
- What temp should I use?
Set 135–140°F for vegetables like potatoes, and hold steady airflow for safe, efficient drying. You can preheat for a few minutes so early moisture doesn’t stall. Higher temps risk case hardening, so resist the urge to crank the dial. - How long do they store?
Store for several months at cool pantry temps, and up to a year around 60°F in airtight containers. You extend shelf life further in the fridge or freezer if your kitchen runs warm. Label jars so you use your oldest first—future you will say thanks. - Do I need to soak before using?
Soak 30–120 minutes for skillet or casserole prep, or simmer directly in soups and stews until tender. Save soaking liquid for flavor and body. Quick guide: 1 cup dried gives about 2 cups rehydrated, which makes planning easy, FYI.
Personal Tips You Can Steal
I cut 1/8‑inch slices when I want fast rehydration for gratin because they hydrate evenly and layer neatly. I stick with boiling‑water blanch for small batches because it runs faster than steam and keeps the timing clean. I store in clear jars with gasket lids at the back of a cool pantry so I can check levels at a glance, and I always run a quick snap test before sealing because that habit saves me later.
- Keep a dedicated “dehydrator towel” for tray cleanup.
- Set a recurring timer at hours two, four, and six for checks.
- Log cut size, blanch time, and temp so you repeat wins.
Wrap‑Up
You can dehydrate potatoes like a pro when you cut evenly, blanch properly, set 135–140°F, and dry to a crisp‑brittle snap before cool, dark storage. You’ll cook faster, waste less, and keep your pantry ready for last‑minute soups, hashes, and gratins. Go prep a tray today and test a skillet hash midweek—your future self will cheer, IMO 🙂
P.S. If you love tracking details, jot times, temps, and cut sizes in a simple kitchen notebook. You’ll tweak faster, repeat your best batches, and keep everything running smoothly 🙂