In this article:
Dehydrate Onions: Time, Temp, and Storage Tips That Work
Craving that punchy onion flavor without the tears or the spoilage stress? Dehydrated onions save money, stash flavor, and turn weeknight cooking into a fast, no-chop situation -yes, please.
Ever wished you could add sweet onion notes to soups, rubs, and marinades in seconds? You can, and it’s super easy with a food dehydrator. FYI, this method smells strong, but the payoff tastes incredible.
Why Dehydrate Onions
Dehydrated onions punch way above their weight: they pack concentrated flavor, rehydrate quickly, and last for months when stored right.
You can turn them into flakes, mince, or silky onion powder for spice blends, dips, and rubs -how handy is that on a busy night? IMO, the control over size, dryness, and freshness beats store-bought every time.
The Right Temperature And Time
Most home dehydrators handle onions beautifully at low to moderate temps, and consistency matters more than speed. Set the dehydrator between 125–155°F (52–68°C) and plan for 7–18 hours depending on slice size, humidity, and your machine’s airflow. Onions finish when they’re brittle, dry, and snap or crumble after cooling – bendable means they still hold moisture.
Common Time/Temperature Combos
- 125°F (52°C) for 10–18 hours gives slow, even drying and great texture.
- 135°F (57°C) often takes 8+ hours and works well for standard slices.
- 155°F (68°C) can finish in 5–10 hours with thin cuts and strong airflow.
What You’ll Need
Keep this simple and focused, because you don’t need fancy gadgets to nail great results. You’ll want a sharp knife or chopper, a cutting board, dehydrator trays with mesh, and airtight jars for storage. Optional but helpful: desiccant packets for long-term storage and a coffee/spice grinder for powder.
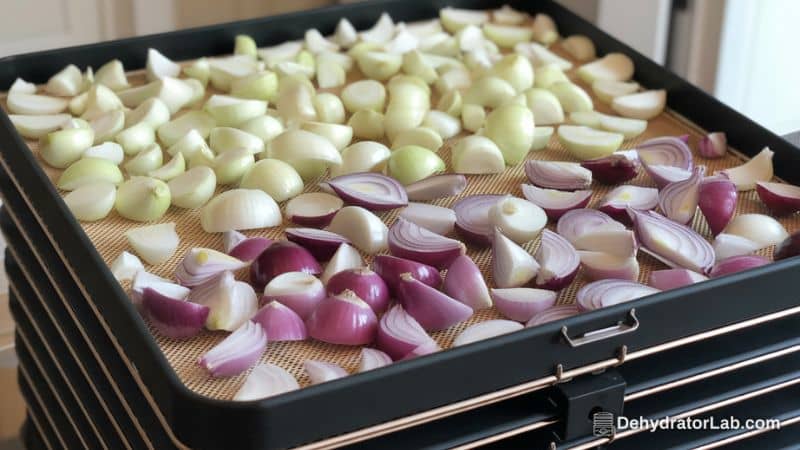
Prep: Slice For Success
Consistent thickness = consistent drying – uneven pieces finish unevenly and risk mold later. Peel and slice onions up to 1/4 inch (6 mm), then separate layers so air reaches every surface. Spread them in a single layer on mesh trays; a little overlapping won’t tank the batch, but single layers dry fastest.
Pro Prep Tips
- Keep slices thin for flakes and faster drying, thicker for chewy bits if you plan to rehydrate in soups.
- Separate rings and chunks before loading trays so they don’t clump and slow airflow.
- Want fewer tears? Chill onions first, then work quickly with a sharp blade.
Load, Set, And Dry
Set your dehydrator to your chosen temperature, then give the trays room so air circulates. Rotate trays after a few hours if your machine doesn’t dry evenly, and don’t crowd pieces – crowding traps moisture and drags the process out. Ever notice how the middle trays lag behind the top and bottom? Rotate them to even things out.
Doneness Check
- Test at the 6–8 hour mark: cool a few pieces and try snapping them.
- Fully dry onions feel light, brittle, and crumbly after cooling.
- If they bend or feel leathery after cooling, keep drying.
Optional Pretreatments: When And Why
You can dry onions without pretreatments—and many people prefer that—but certain methods can speed things up or help color.
Research and practice show osmotic salting (a brief soak in a salt solution) can cut drying time and preserve color, while other pretreatments like blanching or sulfite dips can change drying behavior and quality. Do you need them? Not usually for onions, but they’re tools in the kit.
Pretreatment Quick Hits
- A short salt solution soak can reduce drying time and help evenness.
- Many vegetables benefit from blanching, but onions don’t require it.
- If you chase absolute speed and uniformity, pretreatments help, but you trade time and extra steps.
Managing The Aroma (Aka The Onion Cloud)
Onions smell bold while drying—no surprise there—and good ventilation makes a huge difference. Run the dehydrator near a window, in a garage, or on a covered patio if the weather cooperates; your future self will thank you. Follow the batch with another savory veg to keep flavor transfer in check.
Cooling, Conditioning, And Storage
You nailed the dry, now protect your work—this step locks in shelf life and prevents sneaky moisture from causing clumping or mold.
Let onions cool completely before sealing them, then condition the batch by shaking jars daily for 7–10 days to equalize residual moisture. If you see condensation or clumps, return them to the dehydrator and dry longer.
Storage Best Practices
- Use airtight containers (canning jars work great) and label with date and cut size.
- Add food-safe desiccant packets for long-term storage and to fight ambient humidity.
- Store in a cool, dark place to preserve flavor and extend shelf life.
Flakes, Mince, Or Powder?
Your cut size determines how you’ll use your onions later—and that flexibility makes dehydrating fun. Onions crumble easily into flakes for soups and stews, mince for meatballs and sauces, or powder for spice blends and rubs.
Ever craved a custom onion-garlic-sumac rub that you can’t find on shelves? Make it once and you’ll never go back.
DIY Onion Powder
- Dry thoroughly, then blitz in a spice grinder until ultra-fine.
- Let powder rest, then grind again for a silkier texture and better flow.
- Store with desiccant and use a clean, dry spoon to prevent caking.
Rehydration And Conversions
You can toss dried onions straight into simmering dishes, or you can rehydrate them in warm water first for quick sautés. A handy kitchen conversion: 1/4 cup dried onion flakes ≈ , 1 medium fresh onion, so you can swap on the fly without guesswork. Isn’t that the exact kitchen math you want mid-recipe? 🙂
Usage Ideas
- Add flakes to soups, stews, and beans and let them plump in the pot.
- Stir powders into rubs, dressings, and dips for even flavor distribution.
- Combine mince with warm broth for quick taco meat or weeknight stir-fries.
Troubleshooting Common Issues
Every dehydrator behaves differently, so don’t sweat small hiccups—fixes are easy and quick. If pieces still bend after cooling, return them for another hour or two and test again. If storage jars show fog or clumps during conditioning, re-dry and resume conditioning until everything stays crisp.
Quick Fixes And Pro Moves
- Uneven drying? Slice thinner and rotate trays midway.
- Lingering smell? Clean trays well and run a savory batch next.
- Powder caking? Add a desiccant packet and keep the jar sealed tightly.
Dehydrator Settings Compared
Different guides recommend slightly different settings, and that’s okay because onions dry across a range. Lower temps (around 125–135°F) emphasize gradual drying and texture; higher temps (155°F) speed things up with thin slices and good airflow. Choose the setting that fits your schedule and your dehydrator’s strengths.
Real-World Guidance
- 125°F for 10–18 hours: reliable and forgiving, great for bulk batches.
- 135°F for 8+ hours: a balanced sweet spot for many home units.
- 155°F for 5–10 hours: faster with thin cuts; monitor closely near the end.
Advanced: Speeding Up Safely
If you love tinkering, pretreatments can shave hours off the clock or tweak color and texture. Salt soaks and other methods can increase drying rates, but onions remain one of the few vegetables that don’t require blanching for quality storage.
Want to experiment on a small batch first and compare side by side? That test makes a great weekend project.
What The Research And Practice Suggest
- Salt solution pretreatment can boost drying rates and help color.
- Many vegetables need blanching to inactivate enzymes, but onions do not.
- Pretreatments can change nutrient and volatile profiles—balance speed with flavor goals.
My Go-To Method
I keep it simple: slice onions thin (about 1/8–1/4 inch), dry at 125–135°F, and rotate trays once halfway through. I look for brittle texture after cooling, then condition for a full week because humidity loves to sneak back in. I jar most as flakes, grind some into powder, and stash a desiccant in each jar—future me always appreciates the easy wins.
Safety And Quality Tips
You maximize shelf life and flavor when you respect a few professional food-preservation habits. Cool completely before sealing to avoid condensation, condition every batch to even moisture, and store airtight in cool, dark spaces.
Keep notes on slice size, temp, hours, and humidity so you can dial in your settings over time—home dehydrators have personalities, and yes, that sounds dramatic because it is.
Quick Checklist
- Cool fully before packing.
- Condition 7–10 days with daily jar checks.
- Use airtight jars; add desiccant for long-term storage.
Conclusion
Dehydrating onions in a food dehydrator turns a humble kitchen workhorse into a shelf-stable flavor bomb that works in everything from soups to spice rubs. Slice evenly, dry at 125–155°F until brittle, then condition and store airtight for long-lasting, fuss-free flavor.
Ready to build your stash and save serious prep time, or do you enjoy crying over onions every week? FYI, the dehydrator wins.