In this article:
Complete Guide to Dehydrating Broccoli: Tips, Storage, and Uses
So you’ve got a pile of broccoli sitting in your fridge and you’re wondering what to do before it goes mushy and sad? Let me tell you, dehydrating it is one of the smartest moves you can make.
Not only does it extend the shelf life of this green powerhouse, but you’ll also have crunchy, nutrient-packed broccoli ready to toss into soups, stews, or even munch on as chips. And honestly, once you try it, you’ll wonder why you didn’t start doing this sooner.
I’m going to walk you through the entire process like we’re chatting over coffee. No fancy jargon, no weird techniques. Just straightforward steps that actually work.
Why Bother Dehydrating Broccoli?
Before we jump into the how-to, let’s talk about the why. Dehydrated broccoli retains almost all its nutrients while taking up way less space in your pantry.
We’re talking vitamins C and K, B vitamins, fiber, magnesium, and potassium. The whole gang stays intact. Plus, it lasts for months (even up to a year) when stored properly.
Ever tried to use up fresh broccoli before it turns into a science experiment in your crisper drawer? Yeah, me too :/ Dehydrating solves that problem completely.
You can grind it into powder for smoothies, rehydrate it for casseroles, or snack on it like chips. The versatility is honestly ridiculous, and IMO, it’s one of the most underrated food preservation methods out there.
What You’ll Need
Here’s your shopping list. Nothing complicated:
- Fresh broccoli (as much as your dehydrator can handle)
- A large pot for blanching
- A big bowl filled with ice water
- A food dehydrator (pick one from our reviews)
- Non-stick sheets or parchment paper (optional but helpful)
- Clean towels or paper towels
- Salt for soaking
That’s it. No expensive gadgets or weird ingredients.
Step 1: Choose and Prep Your Broccoli
Start with fresh, firm broccoli heads. None of that yellowing, wilted stuff. Cut the crowns into small, even-sized florets, about half an inch each.
Uniform size matters here because you want everything to dry at the same rate.
Don’t toss those stems! Seriously, they’re just as nutritious and tasty as the florets. Just cut off about half an inch from the bottom, peel away the tough outer layer, and slice the stems into thin strips.
You can dehydrate them separately since they’ll take longer to dry than the florets.
Here’s a trick I learned: soak your broccoli in salt water for about 10 minutes. This flushes out any hidden bugs or dirt.
Then rinse it thoroughly with clean water. Nobody wants extra protein, if you know what I mean 😉
Step 2: Blanch Like a Pro
Alright, here’s where things get real. Blanching is non-negotiable if you want your dehydrated broccoli to keep that gorgeous green color and not turn into brown, sad little nuggets.
Blanching also slows down decomposition and helps preserve nutrients.
Bring a large pot of water to a rolling boil. While that’s heating up, prepare a big bowl of ice water. Like, lots of ice. You’re going to need it.
The Blanching Process
Once your water is boiling, work in small batches. Toss your broccoli florets into the boiling water and cook for about 2-3 minutes.
Some sources say 8-10 minutes, but honestly, that’s overkill, and you’ll end up with mush. Stick with 2-3 minutes for florets and maybe 5 minutes for thicker stems.
Immediately remove the broccoli with a slotted spoon and plunge it straight into the ice bath. This stops the cooking process instantly and locks in that bright green color.
Let it chill for a couple of minutes, then drain thoroughly.
Step 3: Dry It Off (Literally)
Before your broccoli hits the dehydrator, it needs to be as dry as possible on the outside. Spread the blanched pieces on clean towels or paper towels and let them air dry for a bit.
You can even give them a gentle pat to remove excess moisture.
Why does this matter? Because extra water on the surface means longer drying time, and nobody’s got all day. Plus, it helps prevent uneven drying.
Step 4: Load Up Your Dehydrator
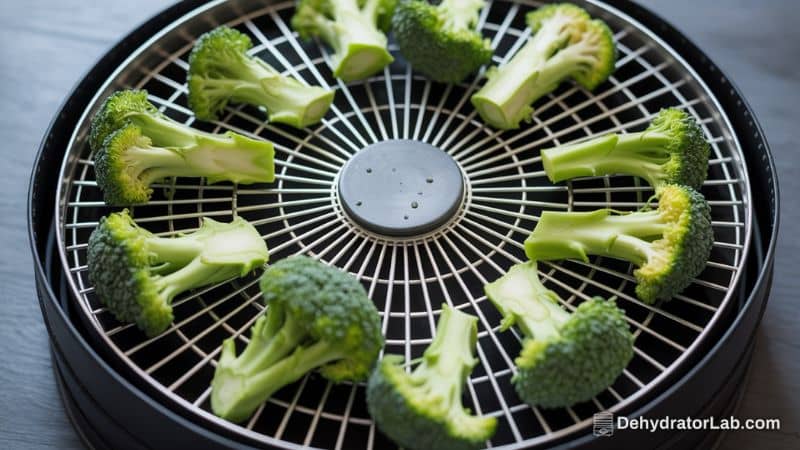
Time to get these bad boys onto the trays. Arrange your broccoli pieces in a single layer with space between each piece.
Air circulation is key here. If you overcrowd the trays, you’re asking for trouble. The air needs to flow evenly around each piece for consistent drying.
If your broccoli tends to stick (and it might), line your trays with non-stick sheets or parchment paper. This makes cleanup way easier, trust me.
FYI, if you’ve got a mix of floret sizes, sort them by size on different trays. Smaller pieces dry faster, and you don’t want to pull everything out at once, only to find some pieces are done while others are still damp.
Step 5: Set the Right Temperature
Here’s where people get confused. Set your dehydrator to 125°F (52°C).
Some folks crank it up to 145°F to speed things along, but that’s risky. Too high and you’ll form a skin on the outside while the inside stays moist. Not ideal.
Pop the lid on and let it run. This is going to take 8-12 hours, depending on the size of your pieces. Yeah, it’s not a quick process, but it’s mostly hands-off.
Step 6: The Waiting Game (and Checking for Doneness)
You don’t have to babysit your dehydrator, but checking in every few hours is smart. Rotate your trays if your machine doesn’t have even air distribution.
This ensures everything dries at the same rate.
After about 3 hours, you can flip the pieces if you want to speed things up. Not mandatory, but it helps.
How to Test for Doneness
How do you know when it’s done? Properly dehydrated broccoli should be crispy and brittle, almost like a potato chip.
If it bends instead of snapping, it needs more time. There should be zero evidence of moisture when you break a piece open.
Here’s a pro tip: if your broccoli finishes late at night, turn the temp down to 95°F and let it run overnight. This prevents reabsorption of moisture while keeping everything safe.
Step 7: Cool and Store Properly
Once your broccoli is done, turn off the dehydrator and let everything cool completely before storing. This usually takes about 15-20 minutes.
Storage is crucial if you want this stuff to last. Keep your dehydrated broccoli in airtight containers in a cool, dark place.
Glass jars with tight lids work great, or you can vacuum-seal them for extra freshness.
Storage Options
If you’re planning to use it within a year, vacuum-sealed mason jars are perfect. For longer storage, consider Mylar bags with oxygen absorbers.
Stored correctly, dehydrated broccoli can last up to a year or even longer.
Bonus: Turn It Into Broccoli Powder
Want to get fancy? Toss your dehydrated broccoli into a blender and pulse until you’ve got a fine powder. This stuff is liquid gold for sneaking vegetables into meals.
Add broccoli powder to smoothies, soups, juices, or even savory baked goods like muffins. It’s an easy way to boost nutrition without changing the flavor much.
I throw it in my morning smoothie and honestly can’t even taste it. Just extra greens doing their thing.
How to Rehydrate Your Broccoli
When you’re ready to use your dehydrated broccoli, rehydrating is super easy. Soak it in hot water for 15-30 minutes, and it’ll plump right back up.
For a slower approach, you can soak it in water overnight in the fridge.
You can also skip rehydrating entirely and toss dried broccoli directly into soups, stews, or casseroles. It’ll absorb the liquid as it cooks. Honestly, this is my go-to method because it’s zero effort.
Common Mistakes to Avoid
Let me save you some headaches by pointing out what not to do:
- Don’t skip blanching. Your broccoli will turn brown and lose flavor
- Don’t overcrowd the trays. Poor air circulation means longer drying times and potential spoilage
- Don’t cut uneven pieces. They’ll dry at different rates and drive you nuts
- Don’t use too high a temperature. You’ll get a crispy outside with a moist inside
- Don’t forget to rotate trays. Uneven drying is frustrating and wasteful
- Don’t store before it’s completely cool. Trapped heat creates condensation and ruins everything
Final Thoughts
Dehydrating broccoli isn’t rocket science, but it does require a bit of patience and attention to detail. Once you’ve got the process down, though, it becomes second nature.
You’ll have a pantry stocked with nutritious, shelf-stable vegetables ready to throw into whatever you’re cooking.
The best part? No more wasted broccoli going bad in your fridge. You’re saving money, reducing food waste, and setting yourself up for easy meal prep.
Plus, dehydrated broccoli chips are actually pretty addictive as a snack.
Give it a shot next time you’ve got extra broccoli. Your future self will thank you when you’re tossing handfuls into a quick weeknight soup without having to chop anything fresh. That’s what I call a win 🙂