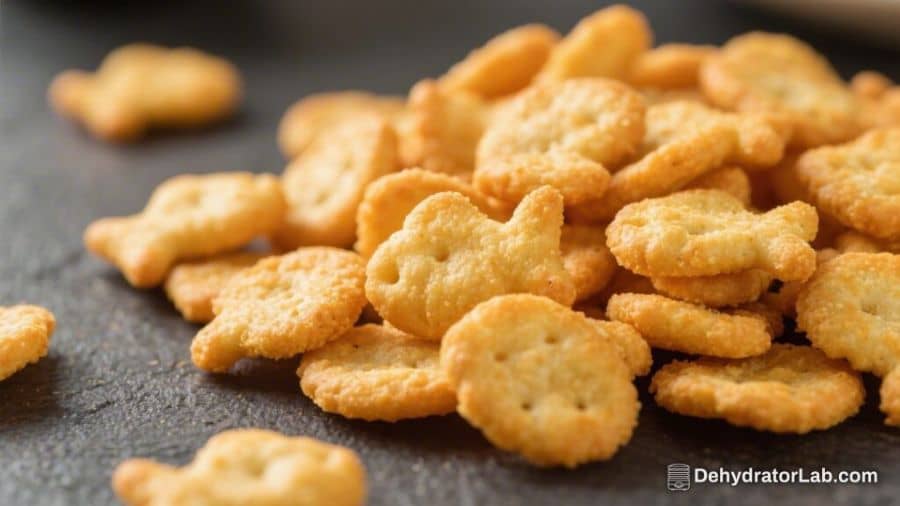
If you grew up snacking on Goldfish crackers, this homemade version will hit all the right notes. They’re crunchy, cheesy, and surprisingly easy to make with an air fryer. You get that classic, toasty bite in a fraction of the time it takes to bake.
Plus, you control the ingredients, the salt, and the flavor add-ins. Whether you’re packing lunchboxes or craving a salty snack, this recipe delivers.
In this article:
What Makes This Recipe So Good
These air fryer Goldfish crackers strike the perfect balance between crisp and tender. The air fryer’s rapid heat gives them a quick, even bake without heating up your whole kitchen.
The dough comes together in minutes with simple pantry staples.
- Fast and fuss-free: From dough to snack in about 30 minutes.
- Real cheese flavor: Sharp cheddar brings bold, nostalgic taste.
- Kid-friendly and customizable: Shape them, color them, and season them your way.
- Better control: Adjust salt, use real butter, skip additives.
- Freezer-friendly: Make the dough or crackers ahead for easy snacking.
Shopping List
- 1 1/2 cups shredded sharp cheddar cheese (packed)
- 3/4 cup all-purpose flour (plus extra for dusting)
- 2 tablespoons cornstarch (for extra crispness)
- 1/2 teaspoon fine sea salt
- 1/4 teaspoon garlic powder (optional)
- 1/4 teaspoon paprika or smoked paprika (optional)
- 3 tablespoons cold unsalted butter, cubed
- 2–3 tablespoons ice water
- Nonstick spray or a light brush of neutral oil
- Flaky salt for finishing (optional)
Step-by-Step Instructions
- Pulse the dry mix: In a food processor, add flour, cornstarch, salt, garlic powder, and paprika. Pulse a few times to combine. The cornstarch helps create a lighter, crisper texture.
- Add cheese and butter: Add the shredded cheddar and cold butter cubes.
Pulse until the mixture looks sandy and holds together when pinched.
- Bring to a dough: Drizzle in 2 tablespoons of ice water and pulse. If it still looks dry, add up to 1 more tablespoon. Stop when the dough just comes together—don’t overwork it.
- Chill briefly: Turn the dough onto a sheet of plastic wrap, press into a flat disk, and chill 10–15 minutes.
This makes it easier to roll and helps the crackers hold their shape.
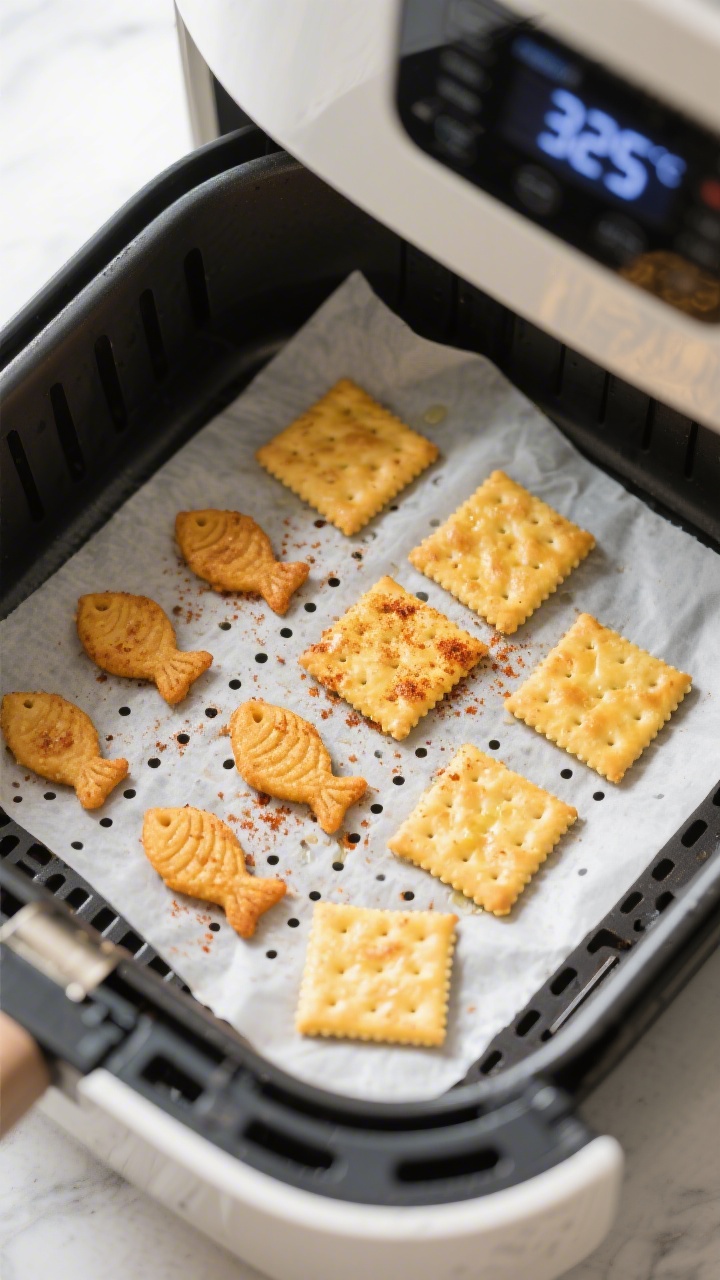
- Preheat the air fryer: Set your air fryer to 325°F (163°C). Let it preheat while you cut the crackers.
- Roll and cut: On a lightly floured surface, roll the dough to about 1/8 inch thick. Use a tiny fish-shaped cutter if you have one, or cut small squares with a knife or pastry wheel.
Aim for bite-size pieces for even cooking.
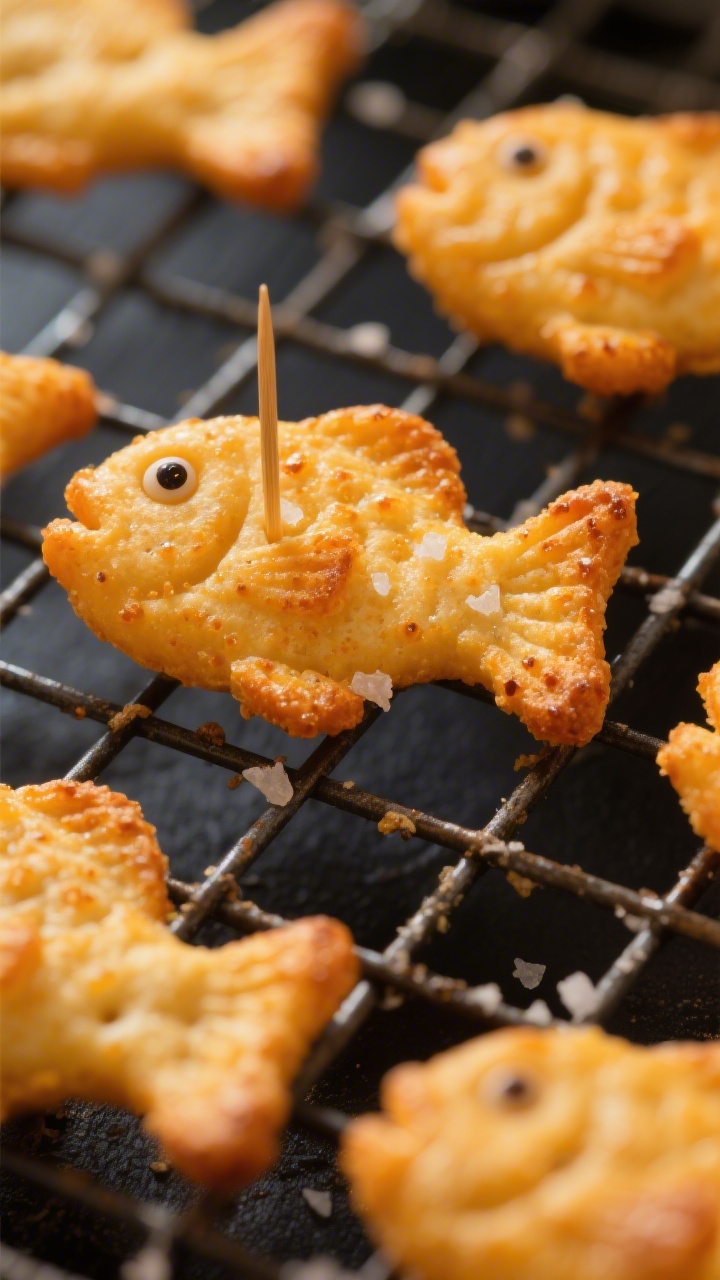
- Vent with a poke: Use a toothpick to poke a small eye or vent hole in each piece. This helps them crisp without puffing too much.
- Load the basket: Lightly oil the air fryer basket or line it with a perforated parchment liner safe for air fryers. Arrange crackers in a single layer with a little space between.
Sprinkle a pinch of flaky salt if you like.
- Air fry: Cook for 4–6 minutes, shaking the basket halfway through. They’re ready when the edges are deep golden and the centers look set. Smaller shapes can finish in as little as 4 minutes; thicker cuts may need 7–8.
- Cool to crisp: Transfer crackers to a wire rack.
They will firm up as they cool. Repeat with remaining dough. Gather and reroll scraps once; too many rerolls can make them tough.
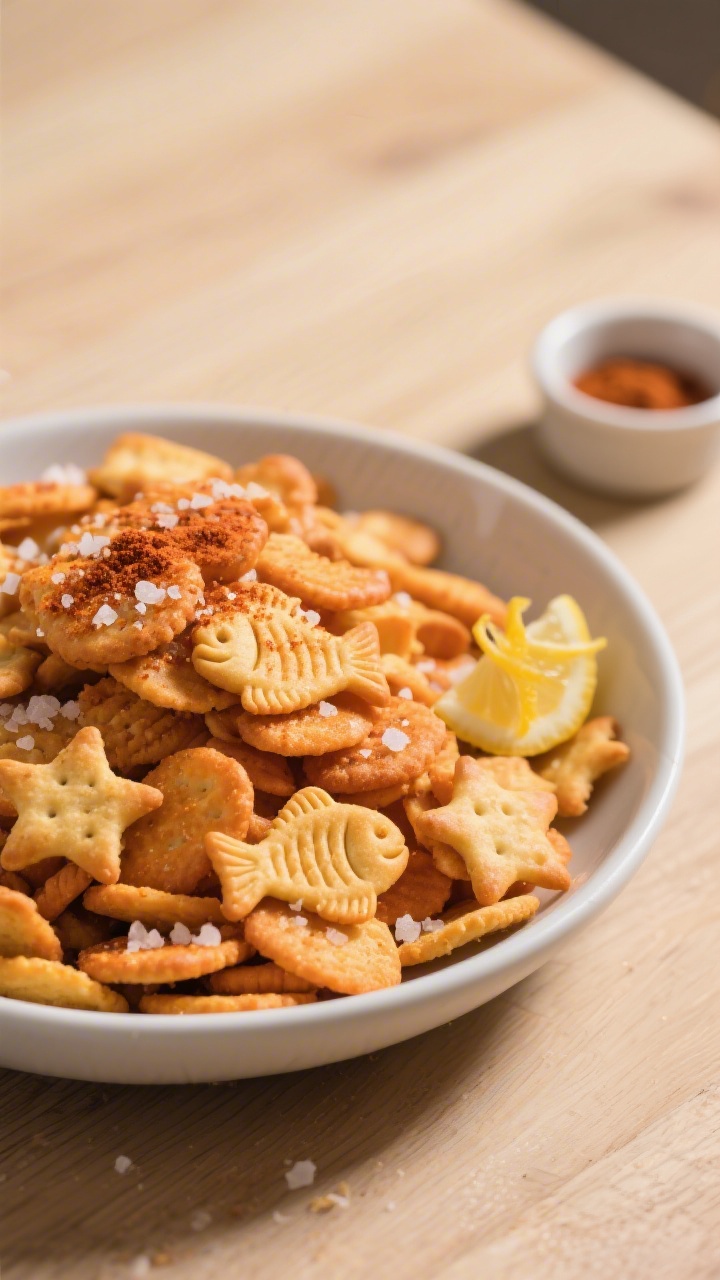
- Taste and season: Once cool, taste and add a light dusting of fine salt, a pinch of paprika, or a squeeze of lemon zest for brightness if you want a twist.
Keeping It Fresh
Let the crackers cool completely before storing.
Any warmth will trap steam and soften them. Store in an airtight container at room temperature for up to 1 week. If they lose crispness, pop them back in the air fryer at 300°F for 1–2 minutes, then cool.
For longer storage, freeze the unbaked dough disk, well wrapped, for up to 2 months.
Thaw in the fridge overnight, then roll and cook as directed.
Why This is Good for You
- Real ingredients: You know exactly what’s in your snack—no mystery oils or preservatives.
- Protein and calcium: Cheddar adds a modest boost of both, making these more satisfying than many store-bought chips.
- Portion control: The bold flavor means you can enjoy a small handful and feel content.
- Lower oil use: Air frying uses minimal added fat while still delivering crunch.
Want to make them even lighter? Swap half the cheddar for a reduced-fat cheddar, or use a mix of sharp cheddar and Parmesan for bigger flavor with less cheese overall.
Pitfalls to Watch Out For
- Overworking the dough: Too much handling makes tough crackers. Stop mixing as soon as the dough comes together.
- Rolling too thick: Thick pieces won’t crisp well and may burn on the edges before the center dries.
Stick to about 1/8 inch.
- Skipping the chill: Warm dough spreads and loses detail. A short chill helps clean cuts and better texture.
- Crowding the basket: Overlapping pieces steam instead of crisp. Cook in batches for even results.
- Ignoring carryover crisping: They firm up after cooking.
Don’t wait for full crunch in the basket or you’ll overshoot and burn them.
Alternatives
- Flour swaps: Use half whole wheat flour for a nuttier taste. For gluten-free, try a 1:1 gluten-free baking blend and add 1/4 teaspoon xanthan gum if your blend doesn’t include it.
- Cheese options: Parmesan, Gruyère, or an extra-sharp white cheddar all work well. Parmesan gives intense umami and a drier, ultra-crispy texture.
- Seasoning twists: Try onion powder, everything bagel seasoning, ranch seasoning, or a pinch of cayenne.
For pizza vibes, add 1/2 teaspoon Italian seasoning and a dusting of grated Parmesan after cooking.
- Dairy-free: Use a firm, meltable dairy-free cheddar and a dairy-free butter stick. Texture will be slightly different but still tasty.
- Shape ideas: No fish cutter? Use mini stars, circles from a piping tip, or simple squares for speed.
FAQ
Can I make these without a food processor?
Yes.
Whisk the dry ingredients, then cut in the butter with a pastry cutter or your fingertips until sandy. Stir in the cheese. Add ice water a little at a time and mix with a fork until the dough holds together.
Do I need perforated parchment in the air fryer?
It helps keep small pieces from falling through and prevents sticking, but it’s optional.
If you use it, weigh it down with a few crackers before turning on the air fryer so it doesn’t blow into the fan.
Why add cornstarch?
Cornstarch reduces gluten formation and lightens the dough, giving a more delicate crunch. If you don’t have it, replace it with the same amount of flour; the crackers will still be good, just slightly denser.
How do I keep the crackers from puffing too much?
Roll the dough evenly, don’t skip the vent poke, and avoid too high of a temperature. 325°F is a sweet spot for color and control.
Can I bake them in a regular oven?
Absolutely. Bake at 350°F (177°C) on a parchment-lined sheet for 10–14 minutes, rotating once, until golden at the edges.
Cool on a rack to crisp.
What if my dough is crumbly?
Add a teaspoon of ice water at a time and gently knead just until it holds together. Dry dough won’t roll cleanly and will crack at the edges.
How small should I cut them?
Bite-size is best—about 3/4 inch long for fish shapes or 1/2-inch squares. Smaller pieces cook faster and crisp more evenly.
Wrapping Up
Air Fryer Goldfish Crackers bring back a favorite snack with a homemade twist.
They’re quick, crunchy, and full of real cheddar flavor. With simple ingredients and a few smart tips, you’ll have a batch ready in no time—perfect for snacking, lunchboxes, or topping soups and salads. Make them once, and they’ll become a regular in your kitchen rotation. For more crunchy snacks, try our Chex Mix or Ranch Crackers.
Air Fryer Goldfish Crackers – Crispy, Cheesy, and Fast
Ingredients
- 1 1/2 cups shredded sharp cheddar cheese (packed)
- 3/4 cup all-purpose flour (plus extra for dusting)
- 2 tablespoons cornstarch (for extra crispness)
- 1/2 teaspoon fine sea salt
- 1/4 teaspoon garlic powder (optional)
- 1/4 teaspoon paprika or smoked paprika (optional)
- 3 tablespoons cold unsalted butter, cubed
- 2–3 tablespoons ice water
- Nonstick spray or a light brush of neutral oil
- Flaky salt for finishing (optional)
Instructions
- Pulse the dry mix: In a food processor, add flour, cornstarch, salt, garlic powder, and paprika. Pulse a few times to combine. The cornstarch helps create a lighter, crisper texture.
- Add cheese and butter: Add the shredded cheddar and cold butter cubes.Pulse until the mixture looks sandy and holds together when pinched.
- Bring to a dough: Drizzle in 2 tablespoons of ice water and pulse. If it still looks dry, add up to 1 more tablespoon. Stop when the dough just comes together—don’t overwork it.
- Chill briefly: Turn the dough onto a sheet of plastic wrap, press into a flat disk, and chill 10–15 minutes.This makes it easier to roll and helps the crackers hold their shape.
- Preheat the air fryer: Set your air fryer to 325°F (163°C). Let it preheat while you cut the crackers.
- Roll and cut: On a lightly floured surface, roll the dough to about 1/8 inch thick. Use a tiny fish-shaped cutter if you have one, or cut small squares with a knife or pastry wheel.Aim for bite-size pieces for even cooking.
- Vent with a poke: Use a toothpick to poke a small eye or vent hole in each piece. This helps them crisp without puffing too much.
- Load the basket: Lightly oil the air fryer basket or line it with a perforated parchment liner safe for air fryers. Arrange crackers in a single layer with a little space between.Sprinkle a pinch of flaky salt if you like.
- Air fry: Cook for 4–6 minutes, shaking the basket halfway through. They’re ready when the edges are deep golden and the centers look set. Smaller shapes can finish in as little as 4 minutes; thicker cuts may need 7–8.
- Cool to crisp: Transfer crackers to a wire rack.They will firm up as they cool. Repeat with remaining dough. Gather and reroll scraps once; too many rerolls can make them tough.
- Taste and season: Once cool, taste and add a light dusting of fine salt, a pinch of paprika, or a squeeze of lemon zest for brightness if you want a twist.
Printable Recipe Card
Want just the essential recipe details without scrolling through the article? Get our printable recipe card with just the ingredients and instructions.