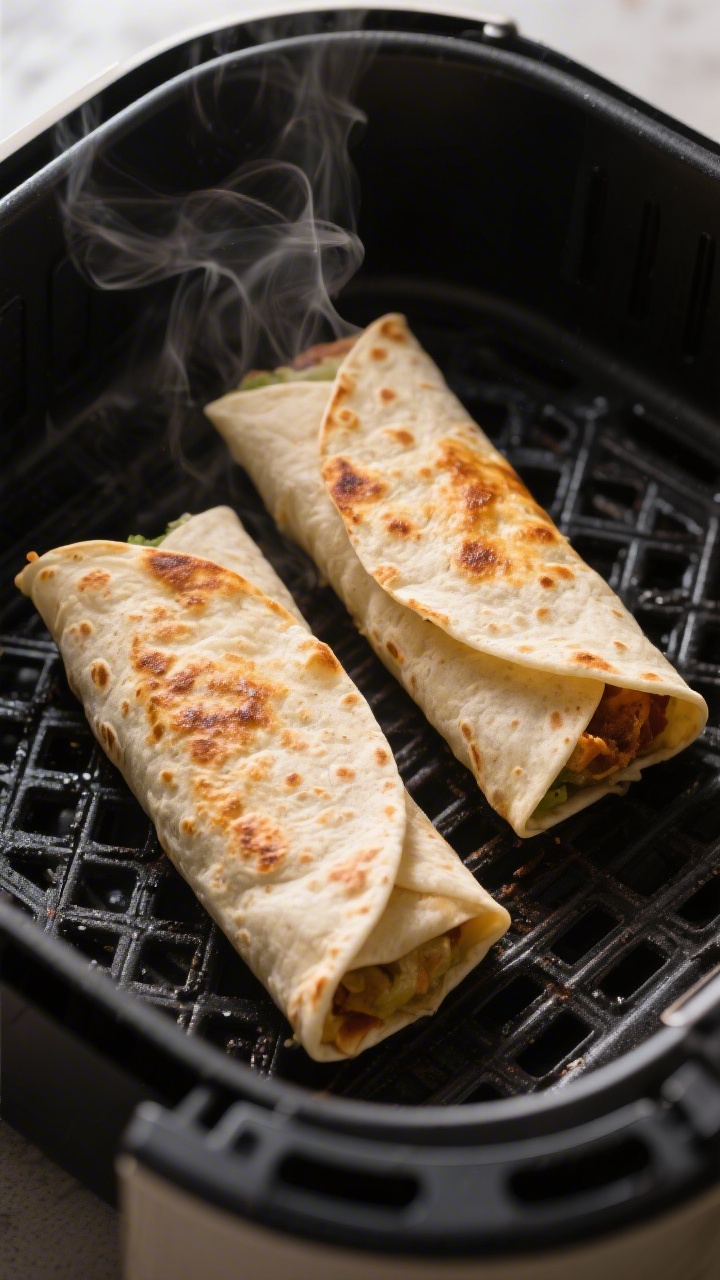
There’s a good chance you’ve got a box of frozen burritos in your freezer right now. The air fryer turns them from soggy microwaved bundles into crisp, golden handheld meals—no fuss and no babysitting a skillet. Whether it’s a quick lunch, a busy weeknight dinner, or a late-night bite, this method hits the spot.
You’ll get a crispy exterior, a hot, melty interior, and dinner on the table in under 20 minutes. Let’s make it easy, reliable, and delicious.
In this article:
What Makes This Special
- Crispy without oil: The air fryer gives burritos a toasty, restaurant-style exterior without deep frying.
- Hands-off cooking: No flipping on a skillet or hovering over a pan—just set, check once, and eat.
- Works with any brand: Beef and bean, chicken, breakfast, or vegetarian—this method adapts to all.
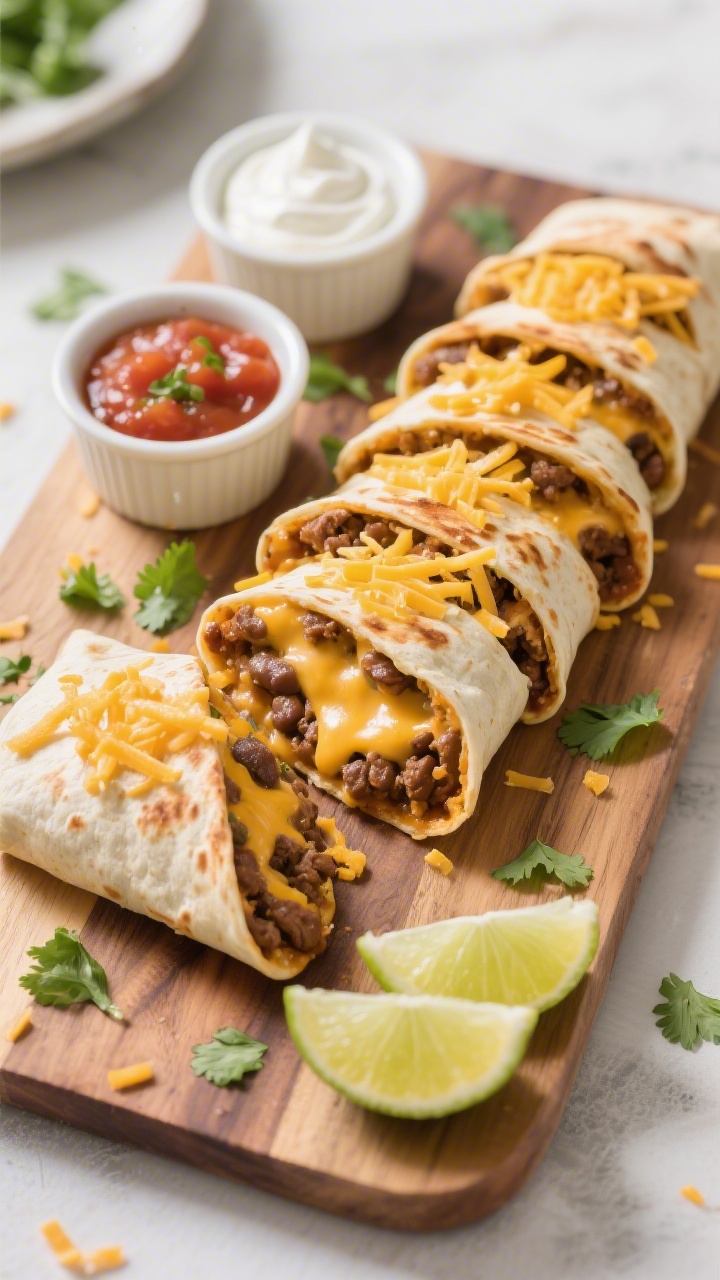
- Custom finish: Add cheese on top, serve with salsa, or slice and load into a bowl. Your call.
- Consistent results: Even heating means fewer cold spots compared to microwaving.
Ingredients
- Frozen burritos (any brand or flavor; standard 4–6 ounce size)
- Cooking spray or a little oil (optional, for extra crispness)
- Shredded cheese (optional, for topping at the end)
- To serve: salsa, hot sauce, sour cream, guacamole, lime wedges, chopped cilantro, or pico de gallo
Instructions
- Preheat the air fryer to 360°F (182°C) for 3–5 minutes.
A hot basket helps crisp the tortilla.
- Prep the burritos: Remove any plastic wrap. If the burrito is wrapped in paper, discard it. Lightly mist the burrito with cooking spray or brush with a tiny bit of oil for extra crunch (optional).
- Arrange in the basket: Place burritos seam-side down in a single layer.
Leave space between them for airflow. Avoid stacking.
- Cook at 360°F (182°C) for 12–16 minutes, flipping halfway. Start checking at 12 minutes.
Burritos should be evenly browned and heated through with no icy center.
- Check the center: If your burrito feels hot but the center is cool, reduce heat to 340°F (171°C) and cook 2–4 more minutes. This helps the inside heat without over-browning the outside.
- Optional cheesy top: In the last 1–2 minutes, sprinkle shredded cheese over the burrito. Return to the air fryer just until melted.
- Rest briefly: Let burritos sit 2 minutes before eating.
The filling settles and finishes heating.
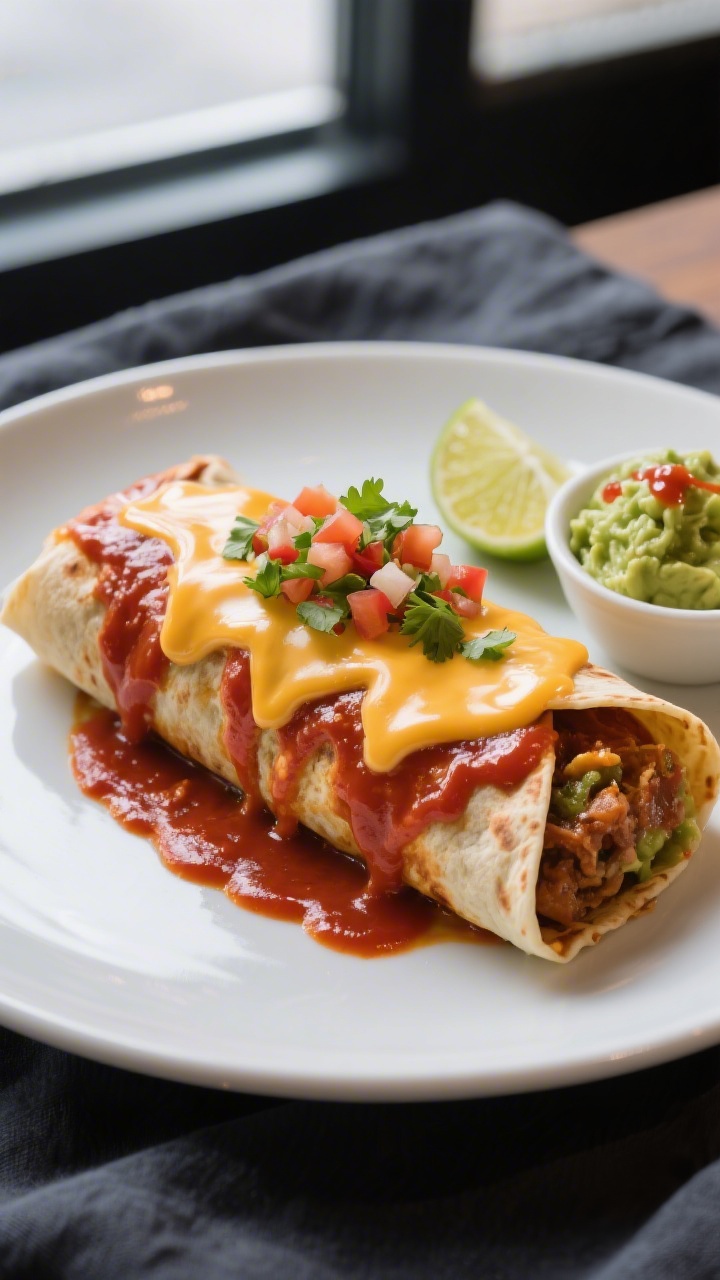
- Serve: Plate with salsa, hot sauce, sour cream, or guacamole. Add a squeeze of lime for brightness.
Storage Instructions
- Leftovers: Cool completely, then store in an airtight container in the fridge for up to 3 days.
- Reheat: Air fry at 350°F (177°C) for 4–6 minutes until hot and crisp. You can also microwave for 60–90 seconds, then crisp in the air fryer for 2–3 minutes.
- Freezing after cooking: Not ideal.
Re-cooking from frozen again can dry out the tortilla. It’s best to cook from frozen once and store leftovers in the fridge.
Benefits of This Recipe
- Fast and reliable: From freezer to plate in about 15 minutes with minimal cleanup.
- Budget-friendly: Stretch a box of frozen burritos into multiple quick meals.
- Customizable: Finish with cheese, sauces, or a side salad to make it feel homemade.
- Better texture: Crispy edges and an evenly heated center beat the microwave any day.
What Not to Do
- Don’t overcrowd the basket. Overlapping burritos leads to soft spots and uneven heating.
- Don’t skip flipping. Turning them halfway ensures both sides brown and heat evenly.
- Don’t blast at high heat from the start. Temperatures above 380°F (193°C) can burn the tortilla before the filling is warm.
- Don’t cook with paper or foil unless needed. Foil slows crisping; paper can scorch. Cook directly on the basket for best results.
- Don’t ignore size differences. Larger burritos may need a few extra minutes at a slightly lower temp to avoid over-browning.
Variations You Can Try
- Breakfast burrito: Serve with scrambled eggs on the side, or add salsa verde and a sprinkle of cheddar in the last minute.
- Smothered style: After air frying, top with enchilada sauce and cheese.
Return to the air fryer for 1–2 minutes to melt.
- Crunch wrap finish: Add a layer of shredded lettuce, diced tomatoes, and a drizzle of chipotle mayo after cooking for a fresh, crunchy contrast.
- Loaded bowl: Slice the burrito into rounds and serve over rice, black beans, corn, and avocado with lime and cilantro.
- Spicy kick: Brush the tortilla lightly with hot sauce before air frying for heat baked into the crust.
FAQ
Should I thaw frozen burritos before air frying?
No. Cook them straight from frozen. Thawing can make the tortilla gummy and easier to tear.
Adjust time slightly based on burrito size and filling.
What temperature works best?
360°F (182°C) is a sweet spot for crisping the outside while heating the center. If the outside browns too fast, drop to 340–350°F (171–177°C) and add 2–4 minutes.
How do I prevent the tortilla from splitting?
Place the burrito seam-side down and avoid high heat early on. Brushing with a little oil also helps keep the tortilla supple while it crisps.
Can I cook multiple burritos at once?
Yes, as long as they’re in a single layer with space between them.
You may need to add 1–3 minutes to the total time.
How do I know it’s heated through?
The burrito should feel hot and firm, and the exterior should be golden. If you’re unsure, insert a knife into the center for 5 seconds—when it comes out hot to the touch, you’re good.
Do different fillings change the cook time?
A bit. Denser fillings like beans or breakfast burritos with eggs and potatoes may need 1–3 extra minutes.
Cheese-forward or smaller burritos may finish faster.
Is it safe to add cheese on top in the air fryer?
Yes. Add cheese in the last 1–2 minutes so it melts without blowing around or burning. Keep the burrito stable and avoid heavy airflow cycles if your model has them.
Can I wrap the burrito in foil?
You can, but it reduces crispiness and extends cook time.
If you’re worried about oozing fillings, wrap loosely for the first half, then remove the foil to finish crisping.
What’s the best way to reheat leftovers?
Air fry at 350°F (177°C) for 4–6 minutes. For speed, microwave 60–90 seconds, then crisp in the air fryer 2–3 minutes.
Which brands work best?
Any mainstream brand works well. Look for burritos in the 4–6 ounce range for the most predictable results and even heating.
Wrapping Up
Air Fryer Frozen Burritos are the kind of meal you can count on—quick, crispy, and satisfying with almost no effort.
Keep your favorite burritos in the freezer, a few toppings in the fridge, and you’ve got an easy win any night of the week. Once you dial in the timing for your air fryer and favorite brand, you’ll get perfect results every time. Grab a plate, add some salsa, and enjoy.
Air Fryer Frozen Burritos – Crispy, Fast, and Foolproof
Ingredients
- Frozen burritos (any brand or flavor; standard 4–6 ounce size)
- Cooking spray or a little oil (optional, for extra crispness)
- Shredded cheese (optional, for topping at the end)
- To serve: salsa, hot sauce, sour cream, guacamole, lime wedges, chopped cilantro, or pico de gallo
Instructions
- Preheat the air fryer to 360°F (182°C) for 3–5 minutes.A hot basket helps crisp the tortilla.
- Prep the burritos: Remove any plastic wrap. If the burrito is wrapped in paper, discard it. Lightly mist the burrito with cooking spray or brush with a tiny bit of oil for extra crunch (optional).
- Arrange in the basket: Place burritos seam-side down in a single layer.Leave space between them for airflow. Avoid stacking.
- Cook at 360°F (182°C) for 12–16 minutes, flipping halfway. Start checking at 12 minutes.Burritos should be evenly browned and heated through with no icy center.
- Check the center: If your burrito feels hot but the center is cool, reduce heat to 340°F (171°C) and cook 2–4 more minutes. This helps the inside heat without over-browning the outside.
- Optional cheesy top: In the last 1–2 minutes, sprinkle shredded cheese over the burrito. Return to the air fryer just until melted.
- Rest briefly: Let burritos sit 2 minutes before eating.The filling settles and finishes heating.
- Serve: Plate with salsa, hot sauce, sour cream, or guacamole. Add a squeeze of lime for brightness.
Printable Recipe Card
Want just the essential recipe details without scrolling through the article? Get our printable recipe card with just the ingredients and instructions.