In this article:
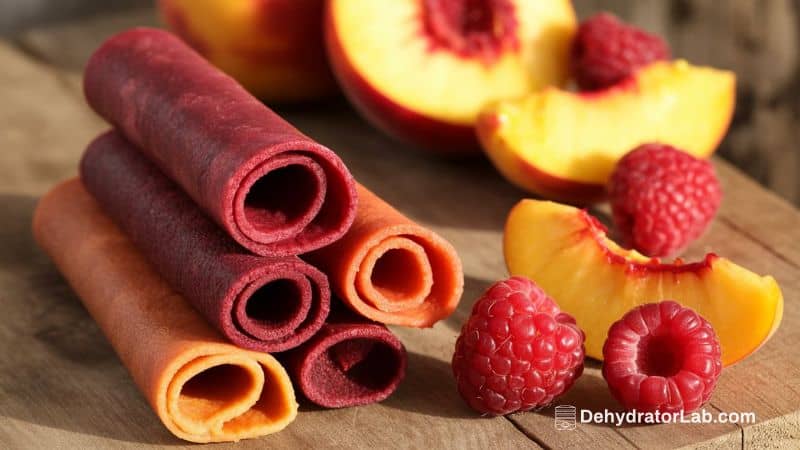
How to Make Raspberry Peach Fruit Leather in a Food Dehydrator
Hey there, fellow snack enthusiast! Are you tired of staring at the sad, overpriced fruit rolls at the grocery store? You know the ones—wrapped in more plastic than a mummy and containing ingredients that sound like a chemistry experiment? Yeah, me too.
What if I told you that you could make your own stunning, all-natural fruit leather at home? And that it would taste infinitely better, like a captured summer sunset? I’m talking about a vibrant, sweet-tart raspberry peach combo that will make you feel like a domestic god or goddess.
It’s easier than you think, and your food dehydrator is the secret weapon. I’ve burned through a few batches (literally, in one unfortunate incident) to perfect this method, and I’m thrilled to share it with you. Let’s get into it.
Why a Food Dehydrator is Your New Best Friend
First things first, why are we using a dehydrator? I mean, can’t you just use your oven?
Sure, you can try the oven method. But in my experience, it’s a finicky, energy-guzzling game of chance. You’re constantly babysitting it, propping the door open with a wooden spoon, and praying you don’t end up with fruit jerky or a sticky, under-dried mess.
A food dehydrator, on the other hand, is designed for one thing: gentle, consistent, low-temperature drying. It’s the set-it-and-forget-it champion of preserving food.
It gives you perfect, pliable fruit leather every single time without heating up your entire kitchen. IMO, if you’re even slightly serious about making healthy snacks, it’s a worthy investment. It’s not just for fruit leather, either—hello, homemade beef jerky and dried herbs!
Gathering Your A-Team: Ingredients & Equipment
You don’t need a ton of fancy gear for this project. The beauty of homemade fruit leather lies in its simplicity.
The Simple Ingredient List:
- 4 cups of fresh, ripe peaches (about 4-5 peaches): The star of the show. Please, for the love of all that is holy, use ripe, in-season peaches. They pack the most flavor and natural sweetness. Are sad, hard winter peaches an option? Technically, yes. Should you use them? Absolutely not.
- 2 cups of fresh raspberries: The tangy co-star that cuts through the peach’s sweetness perfectly.
- 1-2 tablespoons of honey or maple syrup: This is optional. Taste your fruit mixture after blending. If your peaches are super sweet and ripe, you might not need any. I usually add a tablespoon just to round out the flavors.
- 1 tablespoon of lemon juice: This little bit of acid is a magic worker. It brightens the whole flavor profile and helps preserve that gorgeous color.
The Equipment Lineup:
- A Food Dehydrator: This is non-negotiable for this guide. Any model will work!
- A Blender or Food Processor: You need something to get that silky-smooth puree.
- A Fine-Mesh Strainer: This is your secret weapon for de-seeding the raspberries and achieving a super smooth texture. You can skip it if you don’t mind the seeds, but trust me, it makes a difference.
- Silicone Spatulas: For spreading and scraping. Don’t try to use a spoon; you’ll just get frustrated.
- Dehydrator Sheets: These are the trays that go inside your dehydrator. Most are non-stick, but if yours aren’t, you’ll need parchment paper cut to size. Do not use wax paper. It will melt, and you will have a very, very bad day.
The Main Event: Crafting Your Fruit Leather
This is where the magic happens. It’s a simple process, but a few pro-tips along the way will guarantee a winning result.
Step 1: Prepping Your Fruit
Wash your fruit thoroughly. For the peaches, you have two choices: peel them or don’t. The skin can add a slightly chewy texture and a more robust flavor. Personally, I blanch them to make peeling a breeze.
- How to Blanch Peaches: Score a small “X” on the bottom of each peach. Dunk them in boiling water for about 30-45 seconds, then immediately transfer them to an ice bath. The skins should slip right off. It’s weirdly satisfying.
- Pit and Chop: Once peeled (or not), slice the peaches in half, remove the pit, and chop them into rough chunks. No need for perfection here.
Now, for the raspberries. We’re going to tackle those tiny seeds.
Step 2: Creating the Perfect Puree
This is the most crucial step for texture. Ever wondered why store-bought leather is so smooth? They strain the heck out of everything.
- Combine your peach chunks and raspberries in the blender.
- Add the lemon juice and your optional honey or maple syrup.
- Blend on high until the mixture is completely smooth.
Now, take your fine-mesh strainer and place it over a bowl. Pour the puree into the strainer and use a spatula to push it through. You’ll be left with a bunch of raspberry seeds in the strainer and the most velvety, seed-free fruit puree you’ve ever seen in the bowl. This step is a bit of a arm workout, but it is 100% worth the effort.
Step 3: Spreading the Canvas
Time to get artistic. Well, as artistic as you can be with a spatula.
- Pour your strained puree onto your dehydrator trays. If you’re using trays with inserts, great. If you’re using parchment paper, make sure it’s cut to fit perfectly.
- Spread the puree evenly to about a 1/4-inch thickness. I aim for the thickness of a thick pancake batter. Too thin, and it will become brittle; too thick, and it will take forever to dry and might end up sticky.
- The key is to make the layer as uniform as possible. This ensures everything dries at the same rate. Pay special attention to the edges—they tend to get too thin and crispy if you’re not careful.
Step 4: The Dehydrating Wait
Here’s the easy part. Place the loaded trays into your dehydrator.
- Set the temperature to 135°F (57°C). This is the standard for fruits.
- Now, you wait. The drying time can vary from 6 to 10 hours, depending on the thickness of your puree, the humidity in your house, and your specific dehydrator model. Don’t panic. This isn’t an exact science.
How do you know when it’s done? The surface should be smooth and tacky, but not sticky. When you touch it, no puree should come off on your finger. The real test is to peel a corner back. It should be pliable and leather-like, tearing slowly like a soft fruit roll-up, not snapping like a cracker.
The Final Countdown: Storing Your Masterpiece
You’ve waited patiently, and your house smells amazing. Now what?
- Carefully remove the trays from the dehydrator and let the fruit leather cool completely. I know, more waiting. But it’s important, I promise.
- Once cool, place a sheet of parchment paper on top of the leather and gently roll it up.
- Use a sharp knife or kitchen shears to cut the roll into strips.
- For long-term storage, you can keep the rolls as-is, or cut them into strips and store them in an airtight container or bag.
Store your fruit leather in a cool, dark place. It should keep for several months. If, by some miracle, it lasts that long. FYI, mine never makes it past two weeks. 🙂
Troubleshooting: Because Stuff Happens
Even pros run into issues sometimes. Here’s a quick cheat sheet:
- It’s too sticky or tacky: It probably just needs more drying time. Pop it back in for another hour and check again.
- It’s brittle and cracking: Unfortunately, you’ve over-dried it. It’s still edible! Just crumble it over yogurt or ice cream. Next time, check it a bit earlier.
- The edges are crispy but the middle is wet: This is usually a sign of uneven spreading. Just trim off the crispy edges and let the middle continue drying.
See? No disaster is truly a disaster here.
So, there you have it. You are now armed with the knowledge to create the most delicious, all-natural raspberry peach fruit leather your kitchen has ever seen. It’s a fun, rewarding project that gives you complete control over what you’re eating. You get to skip the weird additives and bask in the glory of a snack you made yourself.
Now go forth, raid the farmer’s market, and fire up that dehydrator. Your future self, happily snacking on a roll of summer, will thank you. Happy dehydrating!