Black beans are a weeknight hero, but cooking a fresh pot every time takes planning. Dehydrated cooked black beans solve that problem. They’re fully cooked, then dried until lightweight and shelf-stable—perfect for quick meals, camping trips, or emergency prep.
Rehydrated, they taste just like a fresh batch. You get all the flavor and savings of cooking from scratch, with the convenience of an instant pantry staple.
In this article:
Why This Recipe Works
This method starts with fully cooked beans, so they rehydrate quickly and evenly without turning chalky. Drying the beans after cooking locks in flavor and shortens future cook times to minutes instead of hours.
You can season the beans before drying, which means they rehydrate with built-in taste. Plus, making a big batch is simple and cost-effective—one pot of beans turns into weeks of meals.
What You’ll Need
- Dry black beans (1–2 pounds, or any amount you like)
- Water for soaking and cooking
- Salt (about 1–2 teaspoons per pound of dry beans)
- Optional aromatics: onion, garlic, bay leaf, cumin, oregano
- Optional seasoning: chili powder, smoked paprika, black pepper
- Dehydrator with mesh trays (preferred) or oven
- Sheet pans and parchment (for oven method)
- Airtight containers: jars, mylar bags, or vacuum-sealed bags
- Desiccant or oxygen absorbers (optional but helpful for long storage)
Step-by-Step Instructions
- Sort and rinse: Spread the dry beans on a tray to spot pebbles or debris. Rinse thoroughly under cold water.
- Soak the beans: Add beans to a large bowl and cover with 3–4 inches of water.
Soak 8–12 hours or overnight. For a quick soak, bring beans and water to a boil for 1 minute, turn off heat, cover, and let sit for 1 hour.
- Drain and rinse: After soaking, drain the beans and rinse. This helps reduce bitterness and speeds up cooking.
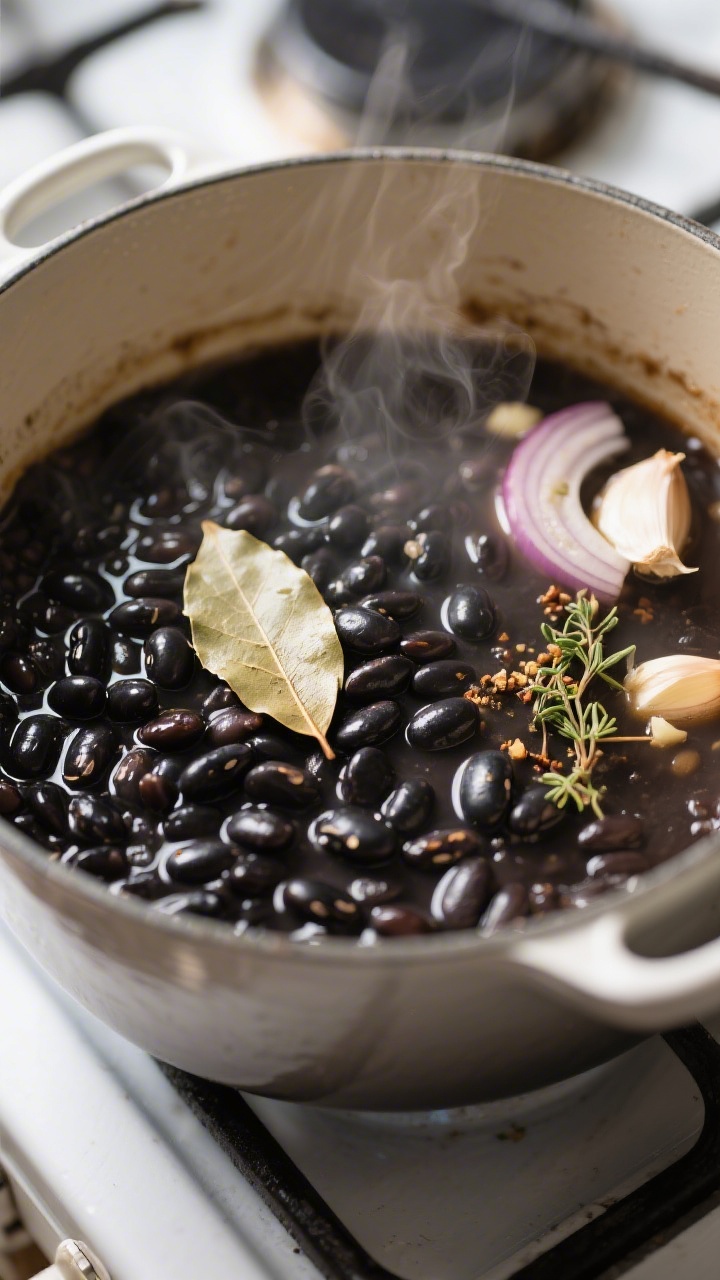
- Cook until tender: Add beans to a large pot and cover with fresh water by 2 inches.
Add aromatics if using (onion, garlic, bay leaf). Bring to a gentle simmer. Cook 45–75 minutes, depending on bean age, until tender but not mushy.
Stir occasionally and skim foam if needed.
- Season near the end: Add salt and spices when beans are almost tender. Seasoning too early can toughen skins. Taste and adjust.
You want them flavorful but not overly salty, since dehydration concentrates taste slightly.
- Drain well: Once cooked, drain the beans thoroughly. Spread them on a clean towel to wick away surface moisture. The drier they are before dehydrating, the faster and more evenly they’ll dry.
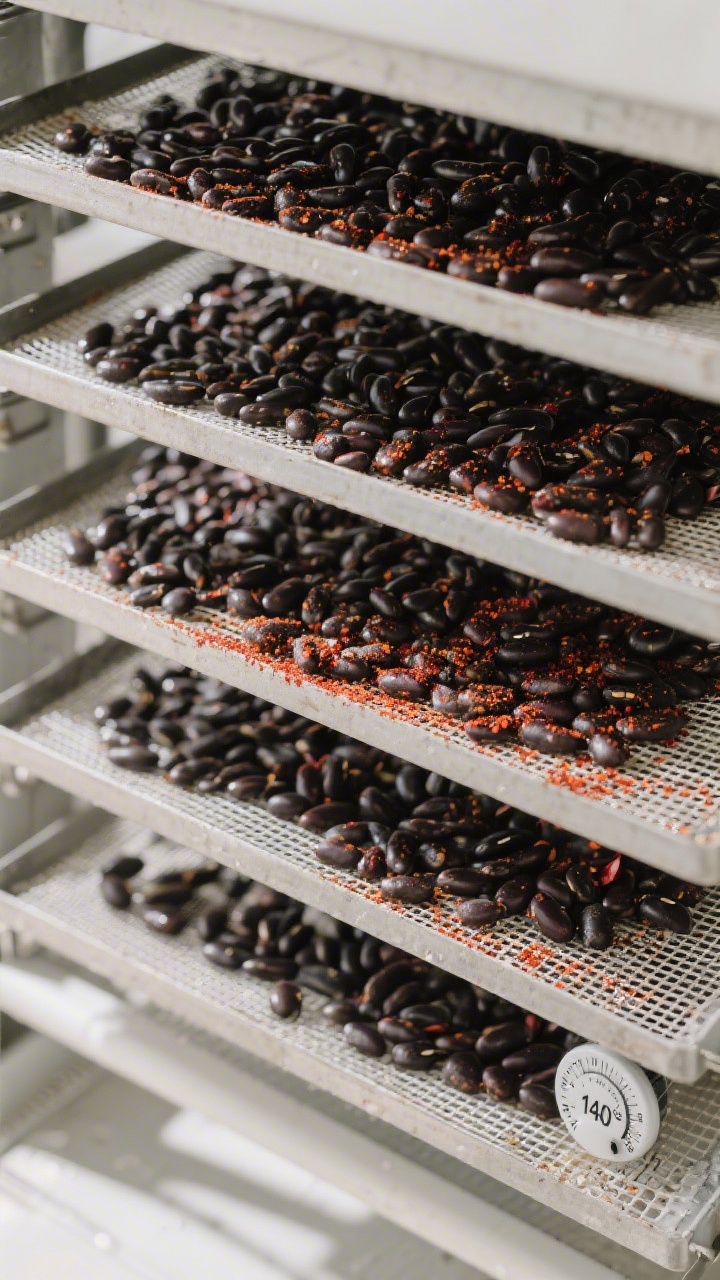
- Set up dehydrator trays: Arrange beans in a single layer on dehydrator trays lined with mesh.
Avoid stacking or clumping—airflow is key.
- Dehydrate low and slow: Dry at 135–145°F (57–63°C) for 8–12 hours. Rotate trays as needed. The beans are done when they are completely dry, firm, and hard to the bite—no softness in the center.
- Oven method (if no dehydrator): Line sheet pans with parchment.
Spread beans in a single layer. Dry at the lowest oven setting (ideally 170–200°F / 75–95°C). Prop the door open slightly with a wooden spoon to release moisture.
Stir every hour. Expect 6–10 hours depending on your oven and batch size.
- Condition the beans: After drying, let the beans cool, then loosely pack them into a jar for 2–3 days, shaking daily. If you see condensation or clumping, they need more drying.
If they stay loose and dry, you’re good to store.
- Package for storage: Store in airtight containers. For long-term storage, use vacuum-sealed or mylar bags with oxygen absorbers. Label with date and seasoning, if any.
- Rehydrate when ready: To use, add 1 cup dehydrated beans to 2–2.5 cups hot water or broth.
Simmer 10–20 minutes, or soak in hot water for 30–45 minutes, until tender. Season to taste and use as you would canned beans.
How to Store
- Short term: Keep in a sealed jar or container in a cool, dark place. Use within 6 months for best flavor.
- Long term: For 1–2 years, use vacuum-sealed or mylar bags with oxygen absorbers.
Store below 75°F if possible.
- After opening: Reseal tightly. Add a fresh desiccant pack to fight humidity.
- Freezer option: Dehydrated beans can also be frozen in sealed bags to extend shelf life and protect from heat.

Why This is Good for You
Black beans are naturally rich in fiber, which supports digestion and helps you feel full. They offer steady energy thanks to a balance of complex carbs and plant-based protein.
You also get important minerals like iron, magnesium, and potassium, plus antioxidants from their deep color. Dehydrating doesn’t strip these benefits, and cooking from scratch lets you control sodium and avoid preservatives.
Common Mistakes to Avoid
- Skipping the soak: You can cook without soaking, but you’ll get longer cook times and less even results. Soaked beans rehydrate more reliably after drying.
- Under-seasoning: Bland beans in mean bland beans out.
Season near the end of cooking so flavors shine without tough skins.
- Not drying completely: Any residual moisture invites mold. Beans should be hard and dry throughout. Test several before storing.
- Overcrowding trays: Piled beans trap moisture and prolong drying.
Keep a single, even layer for steady airflow.
- Skipping conditioning: This quick step catches hidden moisture. If you see foggy jar walls, dry them more.
- Using very high heat: Heat that’s too high can crack skins and cook rather than dry, leading to tough beans that won’t rehydrate well.
Variations You Can Try
- Southwest-Style: Add cumin, chili powder, smoked paprika, oregano, and a bay leaf to the cooking water. Rehydrate with a splash of lime.
- Garlic-Herb: Simmer beans with garlic, onion, thyme, and a pinch of rosemary.
Great for salads and grain bowls.
- Chipotle-Lime: Stir in chopped chipotle in adobo and lime zest before drying. Bright and smoky when rehydrated.
- No-Salt Base: Keep them plain for maximum flexibility, then season when you rehydrate.
- Broth Boost: Cook beans in vegetable or chicken broth for deeper flavor that carries through drying.
FAQ
Do I have to soak the beans first?
No, but soaking leads to more even cooking and faster dehydration. If you’re short on time, use the quick-soak method to split the difference.
How do I know when the beans are dry enough?
They should be very firm, hard, and not at all leathery.
Break one open—there should be no soft or gummy center. If in doubt, dry longer.
Can I dehydrate canned black beans?
Yes. Rinse and drain them well, then dry as directed.
They may take slightly less time in the dehydrator because they’re already soft and uniformly cooked.
How long do dehydrated beans last?
In a cool pantry with a tight seal, expect 6–12 months. With mylar and oxygen absorbers, up to 2 years or more. Heat and humidity shorten shelf life.
How do I rehydrate for best texture?
Cover with hot water or broth and simmer gently until tender, usually 10–20 minutes.
A brief soak in hot water first speeds things up. Add salt or acid at the end if the beans seem tough.
Can I grind dehydrated beans into powder?
Absolutely. Blend into a fine powder to make instant refried beans or to thicken soups.
Whisk into hot water with seasonings and cook a few minutes until smooth.
What dishes work well with rehydrated beans?
Tacos, burritos, bowls, soups, chili, salads, quesadillas, and scrambles. They also mash beautifully for spreads or refried-style beans.
Is it safe to dehydrate beans at low temperatures?
Yes, as long as the beans are fully cooked first and thoroughly dried. Stick to 135–145°F for steady, safe dehydration and always store in airtight containers.
Why are my rehydrated beans splitting?
Rapid temperature changes and very high heat can cause splitting.
Rehydrate gently at a low simmer and avoid boiling hard.
Can I season after dehydration instead?
Yes. If you want more flexibility, keep them plain and season when rehydrating. Add salt, spices, and a little oil or broth at the end for best flavor.
Final Thoughts
Dehydrated cooked black beans offer the best of both worlds: homemade quality with instant convenience.
Make a big batch once, and you’ll have fast, flavorful protein ready for busy nights, camping, and everything in between. With the right drying and storage, they stay fresh and dependable for months. Keep a jar in your pantry, and weeknight meals just got a lot easier.

Dehydrated Cooked Black Beans – Easy, Shelf-Stable, and Ready for Anything
Ingredients
- Dry black beans (1–2 pounds, or any amount you like)
- Water for soaking and cooking
- Salt (about 1–2 teaspoons per pound of dry beans)
- Optional aromatics: onion, garlic, bay leaf, cumin, oregano
- Optional seasoning: chili powder, smoked paprika, black pepper
- Dehydrator with mesh trays (preferred) or oven
- Sheet pans and parchment (for oven method)
- Airtight containers: jars, mylar bags, or vacuum-sealed bags
- Desiccant or oxygen absorbers (optional but helpful for long storage)
Instructions
- Sort and rinse: Spread the dry beans on a tray to spot pebbles or debris. Rinse thoroughly under cold water.
- Soak the beans: Add beans to a large bowl and cover with 3–4 inches of water.Soak 8–12 hours or overnight. For a quick soak, bring beans and water to a boil for 1 minute, turn off heat, cover, and let sit for 1 hour.
- Drain and rinse: After soaking, drain the beans and rinse. This helps reduce bitterness and speeds up cooking.
- Cook until tender: Add beans to a large pot and cover with fresh water by 2 inches.Add aromatics if using (onion, garlic, bay leaf). Bring to a gentle simmer. Cook 45–75 minutes, depending on bean age, until tender but not mushy.Stir occasionally and skim foam if needed.
- Season near the end: Add salt and spices when beans are almost tender. Seasoning too early can toughen skins. Taste and adjust.You want them flavorful but not overly salty, since dehydration concentrates taste slightly.
- Drain well: Once cooked, drain the beans thoroughly. Spread them on a clean towel to wick away surface moisture. The drier they are before dehydrating, the faster and more evenly they’ll dry.
- Set up dehydrator trays: Arrange beans in a single layer on dehydrator trays lined with mesh.Avoid stacking or clumping—airflow is key.
- Dehydrate low and slow: Dry at 135–145°F (57–63°C) for 8–12 hours. Rotate trays as needed. The beans are done when they are completely dry, firm, and hard to the bite—no softness in the center.
- Oven method (if no dehydrator): Line sheet pans with parchment.Spread beans in a single layer. Dry at the lowest oven setting (ideally 170–200°F / 75–95°C). Prop the door open slightly with a wooden spoon to release moisture.Stir every hour. Expect 6–10 hours depending on your oven and batch size.
- Condition the beans: After drying, let the beans cool, then loosely pack them into a jar for 2–3 days, shaking daily. If you see condensation or clumping, they need more drying.If they stay loose and dry, you’re good to store.
- Package for storage: Store in airtight containers. For long-term storage, use vacuum-sealed or mylar bags with oxygen absorbers. Label with date and seasoning, if any.
- Rehydrate when ready: To use, add 1 cup dehydrated beans to 2–2.5 cups hot water or broth.Simmer 10–20 minutes, or soak in hot water for 30–45 minutes, until tender. Season to taste and use as you would canned beans.
Printable Recipe Card
Want just the essential recipe details without scrolling through the article? Get our printable recipe card with just the ingredients and instructions.