In this article:
Dehydrate Oranges in a Food Dehydrator
So, you’ve got a bag of oranges and a food dehydrator staring at you from the counter. Maybe you’re dreaming of festive holiday garlands, a zero-waste snack, or just a kitchen experiment that doesn’t involve a potential fire hazard. I get it. I’ve been there.
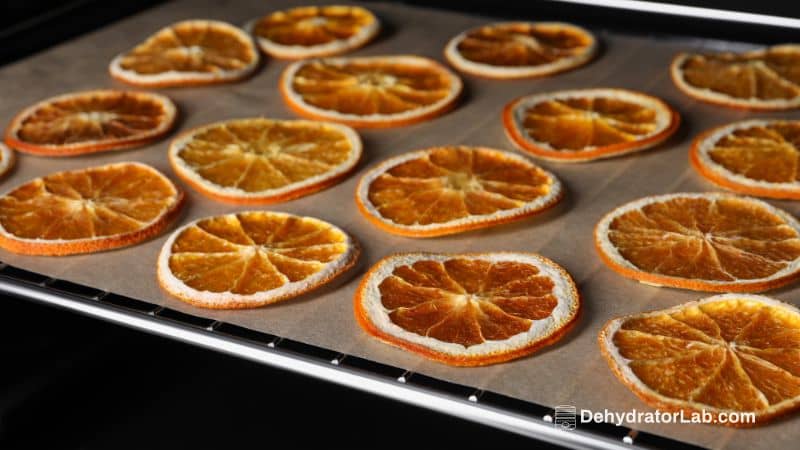
Let me tell you, dehydrating orange slices is one of the most satisfying projects you can do. It’s almost magical to watch those plump, juicy wheels transform into beautiful, translucent gems.
And the best part? It’s ridiculously easy. Forget those expensive store-bought versions; we’re about to make your house smell like a citrus grove and your pantry look incredibly fancy.
Ready to turn those oranges into sunshine-on-demand? Let’s do this.
Why Bother Dehydrating Oranges Anyway?
Before we get our hands sticky, you might be wondering why you shouldn’t just eat the orange and be done with it. Fair question. Dehydrating isn’t just about preservation; it’s about creating something entirely new.
Dehydrated orange slices are incredibly versatile. You can use them as:
- Edible Garnishes: Elevate your cocktails, mocktails, and cakes from “meh” to magnificent.
- Healthy Snacks: A sweet, chewy treat without any added sugar. Kids (and let’s be honest, adults) love them.
- Natural Decor: Thread them into gorgeous garlands for your Christmas tree or wreaths. They smell amazing for months.
- Tea Time Heroes: Drop a slice or two into your tea for a subtle, natural citrus flavor.
Plus, it feels a little bit like a science project you can actually eat. What’s not to love?
What You’ll Need
You don’t need a ton of fancy equipment, I promise. Here’s your simple checklist:
- Oranges: Navel oranges are my go-to. They’re big, have a thick-ish skin that holds up well, and are usually seedless. But feel free to experiment with blood oranges or cara caras for a stunning color pop!
- A Sharp Knife: A sharp chef’s knife or serrated bread knife works best. A dull knife will crush the slices instead of cutting them. Not ideal.
- A Food Dehydrator: This is the star of the show. I use a basic stackable model with a fan at the bottom, and it’s never let me down. You don’t need the spaceship-looking one with all the digital bells and whistles.
- Mandoline Slicer (Optional, but Highly Recommended): IMO, this is a game-changer. It guarantees perfectly uniform slices, which is the secret to everything drying at the same rate. If you use one, for the love of your fingertips, use the safety guard!
- Paper Towels: For a quick pat-down.
See? Nothing crazy. You probably have most of this already.
A Step-by-Step Guide to Perfect Orange Slices
This is where the magic happens. Follow these steps, and you’ll be a pro in no time.
Step 1: The All-Important Wash and Slice
First things first, give those oranges a good scrub under cool water. You’re dehydrating the peel, too, so you want to remove any wax or residue. Trust me on this.
Now, for the slicing. This is the most critical step for success. Uniform thickness is non-negotiable. If your slices are all different thicknesses, you’ll have some that are burnt to a crisp and others that are still soggy in the center.
- If using a mandoline: Set it to about 1/4-inch thick. This is the sweet spot. Thicker than that, and they take forever to dry; thinner, and they can become brittle and burn.
- If using a knife: Channel your inner TV chef and aim for consistent 1/4-inch slices. Take your time. It’s not a race.
As you slice, you can pop out any seeds you find. It’s a minor step, but it makes for a prettier final product.
Step 2: To Blanch or Not to Blanch?
Ever wondered why some dehydrated oranges look dull and others look vibrant? The secret is blanching.
Blanching is simply dunking the orange slices in boiling water for about 60-90 seconds and then immediately transferring them to an ice bath. Why would you put yourself through this extra step?
- It preserves that bright, sunny color. The heat deactivates the enzymes that cause browning.
- It can slightly reduce the drying time by softening the pectin in the rind.
Here’s my honest take: I almost always skip it. I’m a bit lazy, and I don’t mind if my oranges have a slightly deeper, caramelized color. They taste the same. If you’re making them for decoration and want that perfect “Instagrammable” look, blanch them. If you’re like me and just want a tasty snack, feel free to skip it. No judgment here :).
Step 3: Pat Them Dry and Load the Trays
However, you got here—blanched or not—you need to dry the surfaces. Grab a couple of paper towels and gently pat both sides of each slice. Removing that surface moisture helps the dehydration process start faster.
Now, lay the slices in a single layer on your dehydrator trays. Don’t let them overlap or touch. The air needs to circulate every single slice for even drying. This isn’t a group cuddle situation.
The Dehydrating Process: Time and Temperature
Okay, let’s talk about the main event. This part is easy, but it requires a little patience.
- Set the Temperature: For citrus and most fruits, you want to set your dehydrator to 135°F (57°C). This temperature is high enough to dry the fruit safely and efficiently but low enough to preserve the nutrients and flavor.
- Set the Time: This is the variable part. Depending on the humidity in your house, the thickness of your slices, and your specific dehydrator, it can take anywhere from 6 to 12 hours.
I know, that’s a big window. But you’re not just setting it and forgetting it for 12 hours. You need to check on them periodically.
How to Know When They’re Done
You can’t just go by the clock. You have to go by feel. Here’s what you’re looking for:
- The Look: The slices will become translucent and much darker in color. The edges will feel dry and leathery.
- The Feel: They should be leathery and pliable, not brittle. When you bend a slice, it shouldn’t snap in half, and you shouldn’t see any beads of moisture. If you see moisture or it feels sticky, it needs more time.
- The “Squeeze” Test: Take a slice and try to squeeze it. If it feels at all soft or squishy in the middle, pop it back in. It should feel dry all the way through.
FYI, the centers of the slices (the pith) will be the last part to dry completely. So, always check the center!
Storing Your Beautiful Dehydrated Oranges
You’ve put in the work, so don’t let it go to waste! Proper storage is key.
- Let Them Cool Completely: This is crucial. Before you even think about storing them, let the slices sit out at room temperature for an hour after they come out of the dehydrator. If you bag them up warm, you’ll trap moisture and create a lovely environment for mold. Not the goal.
- Choose Your Container: Store them in an airtight container. I use glass mason jars because I can see my beautiful handiwork.
- Find the Right Spot: Keep the jar in a cool, dark, and dry place. Your pantry is perfect.
Stored correctly, your dehydrated orange slices can last for up to a year. Just give the jar a shake every now and then to redistribute them.
Troubleshooting – When Things Go Slightly Pear-Shaped
Sometimes, despite our best efforts, things don’t go perfectly. Here’s how to fix common issues:
- My oranges are taking FOREVER to dry: If it’s been 12+ hours and they’re still tacky, your slices might be too thick, or the humidity in your house might be high. Just give them more time. You can also try rotating the trays if your dehydrator has hot spots.
- My oranges turned out brittle and burnt: The temperature was likely too high, or the slices were too thin. Remember, we’re going for leathery, not crispy.
- They got moldy in storage: This means they either weren’t fully dehydrated or you stored them before they cooled down completely. Sadly, you have to toss them. Learn from it and try again!
Fun Ways to Use Your Dehydrated Oranges
The fun doesn’t stop when they’re dry. Now you get to use them!
- Grind them into Powder: Throw a few slices into a spice grinder and pulse into a fine citrus powder. It’s incredible on roasted chicken, in salad dressings, or dusted over desserts.
- Create Gift Mixes: Add dehydrated orange slices to homemade tea blends or mulling spice sachets. They make incredibly thoughtful and beautiful gifts.
- Chocolate-Dipped Delights: Melt some dark chocolate and dip half of a dehydrated slice in it. Let it sit on parchment paper. You’re welcome.
So, there you have it. Dehydrating orange slices is less of a chore and more of a fun, rewarding kitchen hack. It fills your house with an incredible aroma, reduces food waste, and gives you a gorgeous, natural product.
Now go forth and dehydrate! Your future self, sipping a cocktail with a beautiful orange garnish, will thank you. Happy dehydrating


