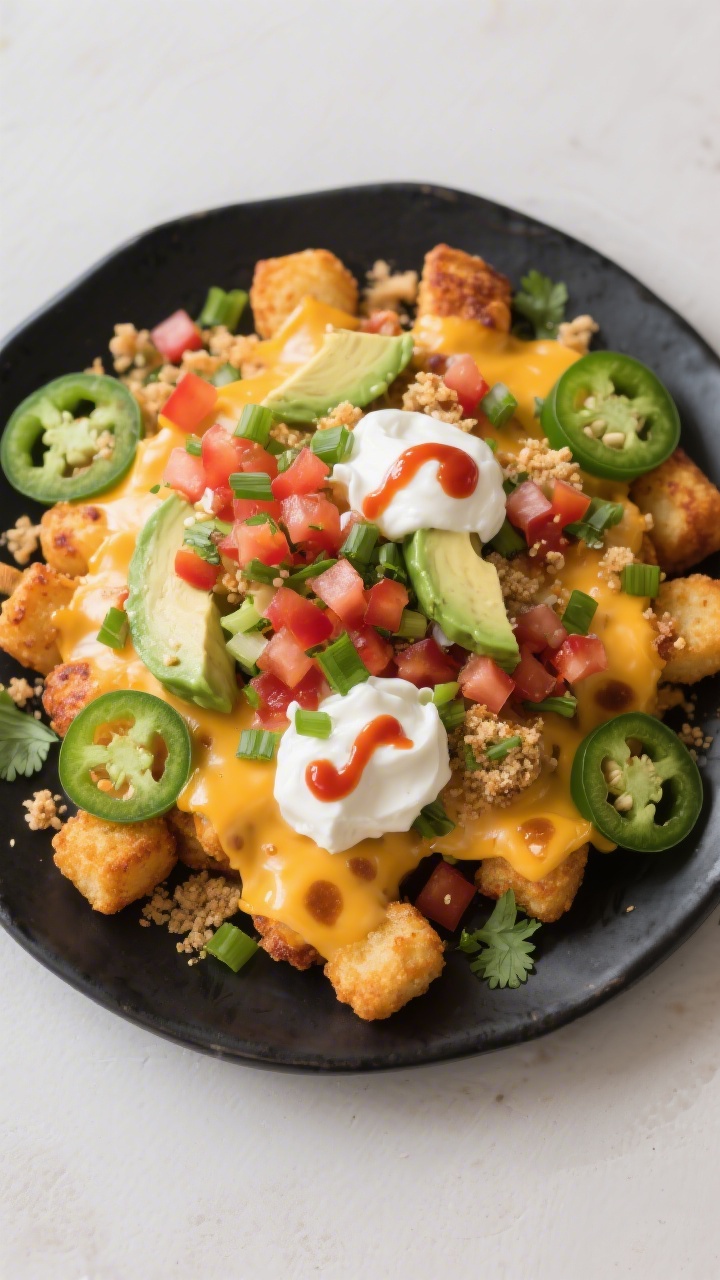
Totchos are everything you love about nachos, swapped with golden, crunchy tater tots. They’re salty, cheesy, and totally snackable—perfect for game day, movie night, or a quick family dinner. Using the air fryer gives you a crisp texture without heating up the whole kitchen.
You’ll get layered flavor with minimal mess and a super fast cook time. Top them however you like and make them your own.
In this article:
Why This Recipe Works

Totchos are all about texture, and the air fryer delivers a shatteringly crisp tot that holds up under cheese and toppings. Layering the cheese halfway through ensures it melts into the tots instead of sliding off.
Using hearty toppings like spiced ground beef or black beans adds protein and richness without turning everything soggy. A quick final blast in the air fryer binds the layers, so every bite feels loaded. Fresh garnishes at the end—like pico, green onions, and jalapeños—bring brightness and crunch to balance the richness.
Shopping List
- Frozen tater tots (1 bag, about 28–32 oz)
- Shredded cheese (2–3 cups; cheddar, Monterey Jack, or a blend)
- Ground beef or turkey (1/2 lb), or black beans (1 can, drained and rinsed)
- Taco seasoning (1–2 tablespoons) or a mix of chili powder, cumin, garlic powder, and paprika
- Pickled jalapeños or fresh jalapeño slices
- Green onions, thinly sliced
- Tomatoes or pico de gallo
- Sour cream or Greek yogurt
- Avocado or guacamole
- Hot sauce or salsa
- Cooking oil spray (optional, for extra crispness)
- Salt and pepper, to taste
Step-by-Step Instructions

- Preheat the air fryer: Set to 400°F (200°C) for 3–5 minutes so the basket is hot before the tots go in.
This helps them crisp quickly.
- Cook the protein (if using): Brown ground beef or turkey in a skillet over medium heat. Drain excess fat, stir in taco seasoning, and a splash of water to coat. Simmer 1–2 minutes, then set aside.
For a vegetarian option, warm black beans with a little seasoning and a squeeze of lime.
- Air fry the tots: Add tots to the air fryer basket in a loose, even layer. Lightly spray with oil and season with a little salt. Cook for 10–12 minutes, shaking halfway, until deep golden and crisp.
Work in batches if needed; avoid crowding.
- Start the first cheese layer: Transfer crispy tots to a heat-safe, air-fryer-friendly pan or line the basket with foil (leaving space around edges for airflow). Sprinkle half the cheese evenly over the tots.
- Add the protein and extras: Scatter your seasoned meat or beans over the cheese. Add jalapeños and a few green onions.
This layering helps the cheese melt and the toppings stick.
- Finish with more cheese: Top with the remaining cheese for that classic “loaded” effect.
- Final melt: Return to the air fryer at 360–375°F for 2–4 minutes, until cheese is fully melted and bubbly. Keep an eye on it to avoid over-browning.
- Top and serve: Slide totchos onto a platter. Add diced tomatoes or pico, more green onions, avocado or guacamole, and dollops of sour cream.
Finish with hot sauce or salsa. Serve immediately while the tots are crisp.
Storage Instructions
Totchos are best fresh, but leftovers can be stored in an airtight container in the fridge for up to 2 days. Reheat in the air fryer at 360°F for 4–6 minutes to revive the crispness.
If possible, store fresh toppings separately and add them after reheating. Avoid freezing; the texture suffers and the tots can turn mealy.
Why This is Good for You
- Balanced macros: With protein from beef, turkey, or beans, plus carbs from tots and some fat from cheese, this snack can be a more complete meal than standard bar food.
- Built-in portion control: The air fryer batch size naturally limits portions and keeps cooking hands-off, so you can build sensible servings.
- Veggie boost: Adding tomatoes, green onions, jalapeños, and avocado brings fiber, vitamins, and healthy fats.
- Less oil, same crunch: Air frying gives you that crispy bite with less added fat than deep frying.
What Not to Do
- Don’t overcrowd the basket: Crowding traps steam and leads to soggy tots. Cook in batches for consistent crispness.
- Don’t skip the first crisp: Melting cheese on raw or soft tots yields a heavy, mushy result.
Get them crispy first.
- Don’t pile on watery toppings before melting: Pico, salsa, and tomatoes should go on after the final melt to prevent sogginess.
- Don’t overdo the cheese thickness: Too much cheese in one layer forms a heavy blanket that slides off. Split it into two layers.
- Don’t forget airflow: If using foil or a pan, leave space around the edges so hot air can circulate.
Variations You Can Try
- Buffalo Chicken Totchos: Toss shredded rotisserie chicken with buffalo sauce. Top tots with mozzarella, chicken, and blue cheese crumbles.
Finish with ranch, celery, and green onions.
- Chili Cheese Totchos: Use thick beef or veggie chili as the topping. Add cheddar and red onions. A little jalapeño and sour cream balances the heat.
- Breakfast Totchos: Add crumbled breakfast sausage or bacon, scrambled eggs, and cheddar.
Finish with salsa and avocado.
- Street Corn Totchos: Mix corn with a bit of mayo or Greek yogurt, lime juice, chili powder, and cotija. Top tots with cheese, corn mix, and cilantro.
- BBQ Brisket Totchos: Use chopped brisket or pulled pork with BBQ sauce, smoked gouda or cheddar, pickled jalapeños, and red onions.
- Veggie Supreme: Use black beans, roasted peppers, corn, onions, and olives with a pepper jack blend. Finish with cilantro and lime crema.
FAQ
Can I use sweet potato tots?
Yes.
They cook a bit faster and brown more quickly due to natural sugars. Check at 8–10 minutes for the first crisp, then proceed with layering and melting as usual.
What if my air fryer is small?
Cook tots in batches and assemble layers on a small, heat-safe pan that fits your basket. Keep the first batch warm in a low oven while you crisp the second, then layer and melt everything together.
How do I keep the tots from sticking?
Use a light spray of oil on the basket and shake the tots halfway through.
If lining with foil, crumple it slightly before pressing it in so air can move and the tots release more easily.
Which cheese melts best?
Cheddar, Monterey Jack, and pepper jack melt smoothly and offer great flavor. A 50/50 cheddar-Jack blend gives both richness and stretch. Freshly shredded cheese melts better than pre-shredded.
Can I make it dairy-free?
Yes.
Use a dairy-free shredded cheese that melts well, and replace sour cream with a plant-based yogurt or cashew crema. Check labels, since some vegan cheeses need an extra minute to melt.
Are frozen tots pre-cooked?
Most are par-cooked, but they still need time to crisp and heat through. Follow the timings here and look for a deep golden color and firm texture before adding cheese.
How do I scale this for a party?
Keep batches moving.
Cook multiple trays of tots in the oven at 425°F while you use the air fryer for the final cheese melt and assembly. Serve on sheet pans with toppings on the side.
What’s the best way to add salsa?
Spoon salsa on individual portions right before eating, or serve it on the side. Too much salsa on the whole tray can soften the tots.
Can I make these gluten-free?
Yes.
Most plain tater tots are gluten-free, but always check the label. Use a gluten-free taco seasoning and ensure any sauces are certified gluten-free.
How spicy should the seasoning be?
Keep the base mild and build heat with jalapeños, hot sauce, or a spicy cheese. This lets everyone adjust at the table without overpowering the dish.
In Conclusion
Air Fryer Totchos give you everything you want in a comfort snack: crisp edges, gooey cheese, and bright, fresh toppings.
They’re fast, flexible, and simple enough for a weeknight yet fun enough for a party. Start with a solid crisp, layer smart, and finish with fresh garnishes for balance. Once you try them this way, the air fryer might become your go-to for every tot night.

Air Fryer Totchos – Crispy, Cheesy, Crowd-Pleasing Comfort
Ingredients
- Frozen tater tots (1 bag, about 28–32 oz)
- Shredded cheese (2–3 cups; cheddar, Monterey Jack, or a blend)
- Ground beef or turkey (1/2 lb), or black beans (1 can, drained and rinsed)
- Taco seasoning (1–2 tablespoons) or a mix of chili powder, cumin, garlic powder, and paprika
- Pickled jalapeños or fresh jalapeño slices
- Green onions, thinly sliced
- Tomatoes or pico de gallo
- Sour cream or Greek yogurt
- Avocado or guacamole
- Hot sauce or salsa
- Cooking oil spray (optional, for extra crispness)
- Salt and pepper, to taste
Instructions
- Preheat the air fryer: Set to 400°F (200°C) for 3–5 minutes so the basket is hot before the tots go in.This helps them crisp quickly.
- Cook the protein (if using): Brown ground beef or turkey in a skillet over medium heat. Drain excess fat, stir in taco seasoning, and a splash of water to coat. Simmer 1–2 minutes, then set aside.For a vegetarian option, warm black beans with a little seasoning and a squeeze of lime.
- Air fry the tots: Add tots to the air fryer basket in a loose, even layer. Lightly spray with oil and season with a little salt. Cook for 10–12 minutes, shaking halfway, until deep golden and crisp.Work in batches if needed; avoid crowding.
- Start the first cheese layer: Transfer crispy tots to a heat-safe, air-fryer-friendly pan or line the basket with foil (leaving space around edges for airflow). Sprinkle half the cheese evenly over the tots.
- Add the protein and extras: Scatter your seasoned meat or beans over the cheese. Add jalapeños and a few green onions.This layering helps the cheese melt and the toppings stick.
- Finish with more cheese: Top with the remaining cheese for that classic “loaded” effect.
- Final melt: Return to the air fryer at 360–375°F for 2–4 minutes, until cheese is fully melted and bubbly. Keep an eye on it to avoid over-browning.
- Top and serve: Slide totchos onto a platter. Add diced tomatoes or pico, more green onions, avocado or guacamole, and dollops of sour cream.Finish with hot sauce or salsa. Serve immediately while the tots are crisp.
Printable Recipe Card
Want just the essential recipe details without scrolling through the article? Get our printable recipe card with just the ingredients and instructions.