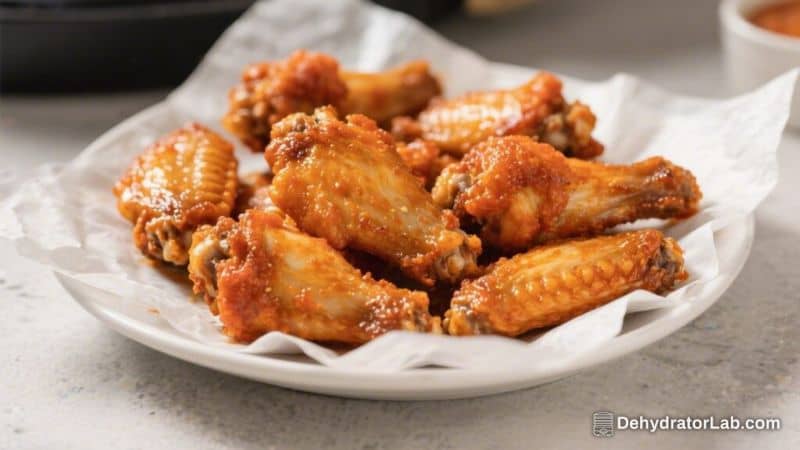
Craving wings but short on time? Frozen chicken wings in the air fryer are the weeknight hero you didn’t know you needed. No thawing, no deep fryer, and no mess—just crispy, juicy wings with a shatter-crisp skin.
You can season them simply or toss them in your favorite sauce for game day or a quick dinner. This method is reliable, easy, and wildly satisfying.
In this article:
What Makes This Special
Air fryers excel at turning frozen food into crispy, golden bites, and chicken wings are the perfect example. Starting from frozen ensures the skin renders slowly while the meat stays juicy.
The two-stage cook time helps cook the wings through, then crisp them up at the end. You get restaurant-quality results at home, with minimal oil and cleanup.
Best of all, you’re in control. Keep them plain and salty, go classic Buffalo, or try sweet and sticky.
This approach works with flats and drumettes, and you can scale it for one or for a crowd.
Shopping List
- Frozen chicken wings (flats and drumettes, about 2 pounds)
- Olive oil or neutral oil spray
- Kosher salt
- Black pepper
- Garlic powder
- Onion powder
- Smoked paprika or regular paprika
- Baking powder (aluminum-free), optional for extra crisp
- Your favorite wing sauce (Buffalo, BBQ, honey garlic, teriyaki, or lemon pepper butter)
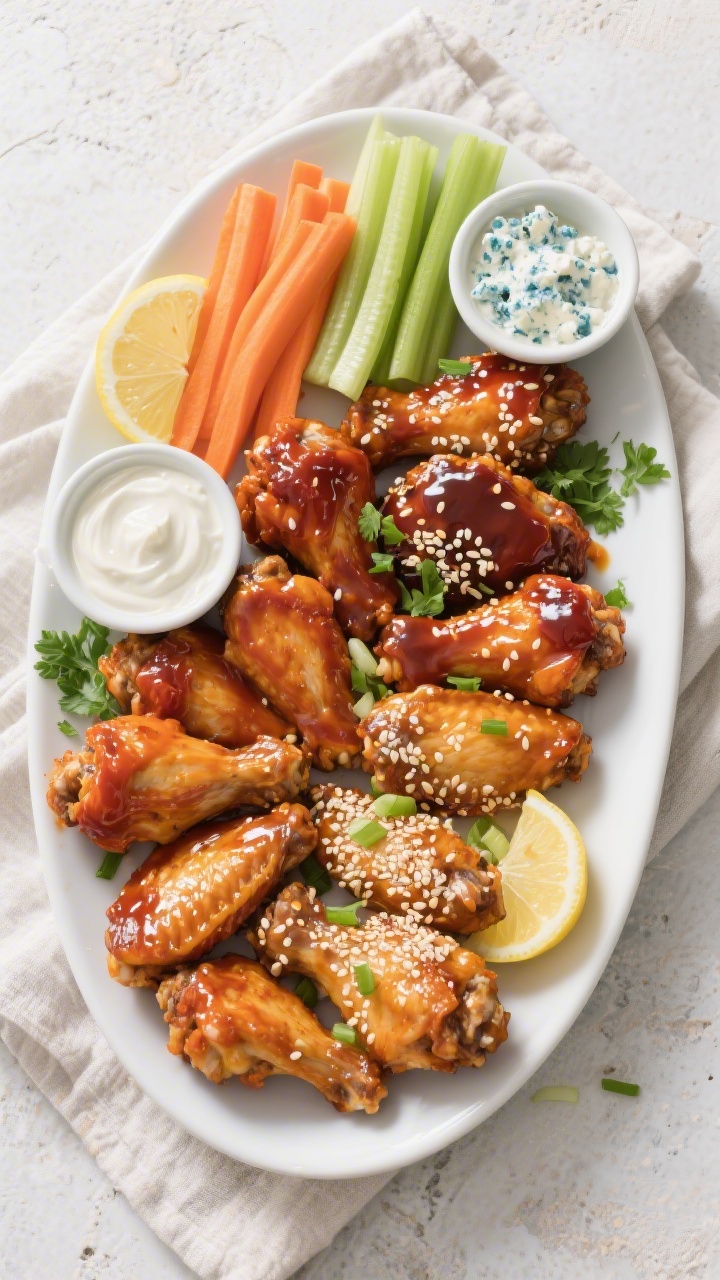
- Optional garnishes: chopped parsley, sliced green onions, sesame seeds, lemon wedges
- Optional dips: ranch, blue cheese, honey mustard
Instructions
- Preheat the air fryer to 360°F (182°C) for 3–5 minutes. A hot basket helps prevent sticking and jumpstarts crisping.
- Separate any frozen clumps. If your wings are stuck together, tap the bag on the counter or run the sealed bag under cool water for a minute to loosen chunks.
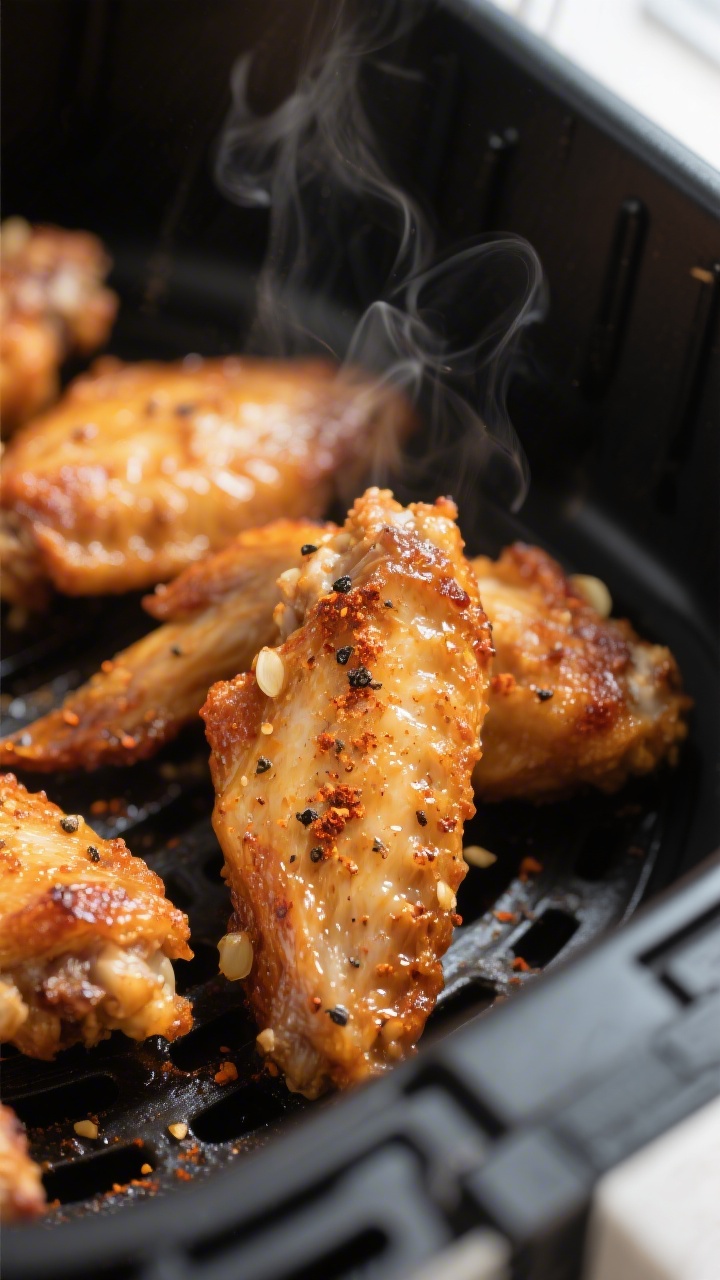
- First cook (from frozen): Place wings in a single layer in the basket. It’s okay if they touch a little, but avoid stacking.
Air fry at 360°F for 12–15 minutes. This stage thaws and begins rendering fat.
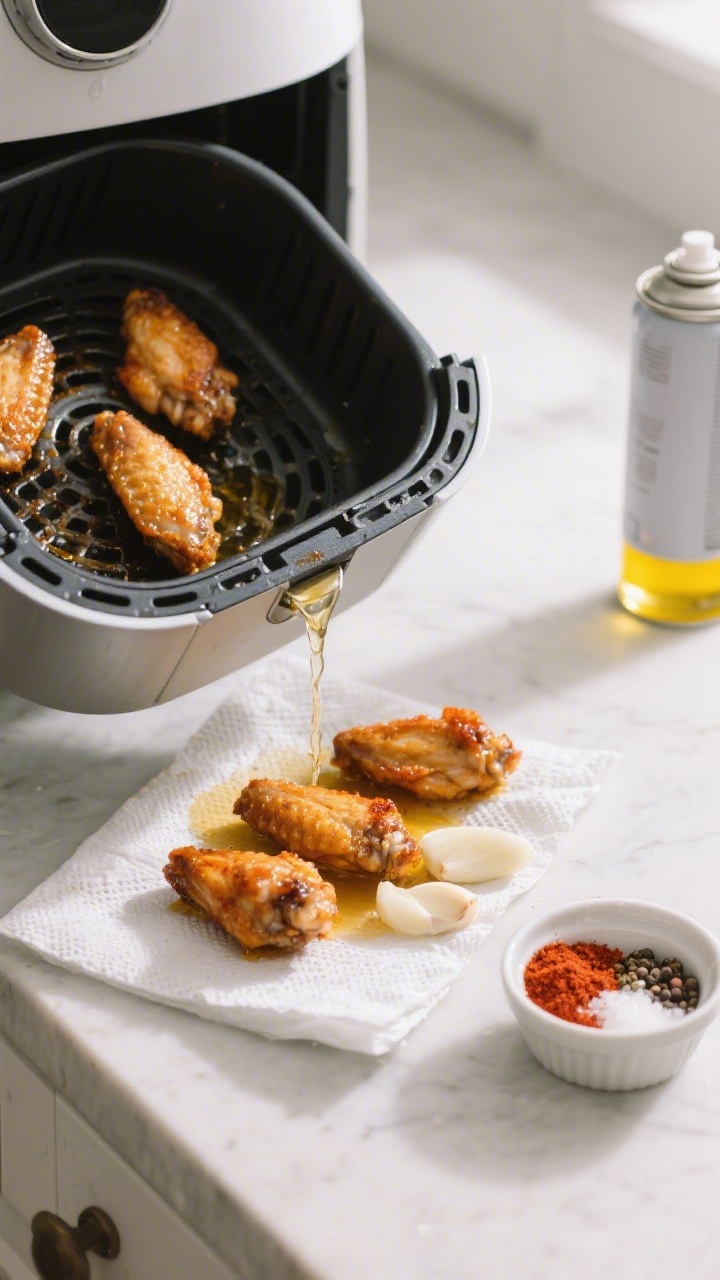
- Drain and blot. Carefully remove the basket and pour off any liquid. Pat wings lightly with paper towels to remove excess moisture.
This step boosts crispiness.
- Season. Toss wings with a light spray of oil (or 1–2 teaspoons oil) plus 1 teaspoon kosher salt, 1/2 teaspoon black pepper, 1 teaspoon garlic powder, 1/2 teaspoon onion powder, and 1 teaspoon paprika. For extra crackle, add 1 teaspoon aluminum-free baking powder and toss well.
- Second cook (crisping stage): Return wings to the basket in a single layer. Air fry at 400°F (204°C) for 10–14 minutes, shaking the basket or flipping wings halfway.
They’re done when the skin is deeply golden and the internal temperature hits 165°F (74°C).
- Adjust for size and model. Smaller wings may be done sooner; larger, meatier wings might need a few extra minutes. Add time in 2-minute increments until crispy.
- Sauce or dry rub. For sauced wings, toss immediately with warmed sauce in a large bowl. For dry-rub lovers, add an extra sprinkle of seasoning while hot.
- Rest and serve. Let wings rest 2–3 minutes to set the crust.
Garnish if you like and serve with dips and crunchy veggies.
Storage Instructions
- Refrigerate: Cool completely, then store in an airtight container for up to 4 days.
- Freeze leftovers: Spread cooled wings on a sheet pan to freeze individually, then transfer to a freezer bag for up to 2 months.
- Reheat (best method): Air fry at 360°F for 5–8 minutes until hot and re-crisped. Add 1–2 minutes at 400°F if needed.
- Microwave: Use only if you must. Wings will be soft; finish in the air fryer for 2–3 minutes to restore crunch.
Benefits of This Recipe
- No thawing needed: Straight from freezer to fryer saves time and planning.
- Consistently crispy: The two-stage cook delivers crunchy skin and juicy meat.
- Healthier than deep frying: Uses very little oil, with a similar texture.
- Flexible flavors: Works with any sauce or rub—Buffalo, BBQ, lemon pepper, or spicy-sweet.
- Minimal cleanup: A quick wipe of the basket beats a pot of hot oil any day.
What Not to Do
- Don’t overcrowd the basket. Stacking traps steam and leads to soggy skin.
- Don’t skip the mid-cook drain and blot. Removing moisture is key to crisp wings.
- Don’t sauce too early. Add sauce after the wings are fully crisp to avoid limp skin.
- Don’t rely on color alone. Use a thermometer; aim for 165°F (74°C) for safe doneness.
- Don’t forget to preheat. A cold basket slows rendering and crisping.
Alternatives
- Seasoning swaps: Try Cajun seasoning, lemon pepper, ancho chili and lime, or a maple-chili dry rub.
- Sauce ideas: Classic Buffalo, honey garlic, gochujang glaze, garlic parmesan butter, or sticky teriyaki with sesame.
- Boneless option: Use frozen boneless wings or nuggets; reduce time by a few minutes and watch closely to prevent drying.
- Gluten-free tweak: Skip baking powder or use a certified gluten-free version; rely on extra drying and higher heat for crispness.
- Spicy route: Add cayenne or chipotle powder to the seasoning, then finish with a hot honey drizzle.
FAQ
Can I cook a full bag at once?
It’s better to cook in batches.
A single, even layer crisps properly. Keep finished wings in a 200°F oven to stay warm while you cook the next batch.
Do I need oil if the wings are already fatty?
A light spray helps seasonings stick and improves browning, but you can skip it. If skipping, be sure to blot moisture mid-cook and bump heat to 400°F longer to crisp the skin.
How do I prevent the basket from smoking?
Pour off excess fat halfway through the cook, and avoid spraying too much oil.
If your air fryer allows, place a small piece of bread or a liner in the drip tray (not the basket) to catch drips. Always follow your model’s safety guidance.
Can I start with thawed wings?
Yes. Reduce the first stage to 6–8 minutes at 360°F, then crisp at 400°F for 8–10 minutes.
The internal temperature should still reach 165°F.
Why use baking powder?
Baking powder raises the pH and encourages tiny bubbles, which helps the skin become extra crispy. Use aluminum-free to avoid a metallic taste, and don’t overdo it—1 teaspoon per 2 pounds of wings is enough.
What if my wings are pre-sauced or glazed?
Cook them plain first until nearly done, then add sauce for the last 2–3 minutes or toss after cooking. This keeps sugar from burning and the skin from going soggy.
How long do larger party wings take?
Big, meaty wings can need 3–6 extra minutes at 400°F.
Shake or flip and check often. If the skin is brown but not yet crisp, reduce heat slightly and extend the time to finish without over-browning.
Can I line the basket with foil or parchment?
Use perforated parchment made for air fryers if your manual allows it. Solid liners can block airflow and reduce crispiness.
Never cover vents.
What dips pair best?
Ranch, blue cheese, garlic yogurt, or a spicy sriracha mayo are classics. For sweet heat, try hot honey or a chili-lime crema.
How do I make them extra spicy?
Season with cayenne or chipotle before cooking, then toss hot wings in Buffalo sauce spiked with extra hot sauce or crushed red pepper. Finish with a sprinkle of chili flakes.
In Conclusion
Air fryer frozen chicken wings are fast, foolproof, and seriously crispy.
With a simple two-stage cook, a quick seasoning, and a final toss in your favorite sauce, you’ll have a crowd-pleasing plate in under 30 minutes. Keep the basket uncrowded, drain moisture halfway, and finish hot for the best crunch. Once you nail this method, weeknight wings are always within reach.

Air Fryer Frozen Chicken Wings – Crispy, Fast, and Fuss-Free
Ingredients
- Frozen chicken wings (flats and drumettes, about 2 pounds)
- Olive oil or neutral oil spray
- Kosher salt
- Black pepper
- Garlic powder
- Onion powder
- Smoked paprika or regular paprika
- Baking powder (aluminum-free), optional for extra crisp
- Your favorite wing sauce (Buffalo, BBQ, honey garlic, teriyaki, or lemon pepper butter)
- Optional garnishes: chopped parsley, sliced green onions, sesame seeds, lemon wedges
- Optional dips: ranch, blue cheese, honey mustard
Instructions
- Preheat the air fryer to 360°F (182°C) for 3–5 minutes. A hot basket helps prevent sticking and jumpstarts crisping.
- Separate any frozen clumps. If your wings are stuck together, tap the bag on the counter or run the sealed bag under cool water for a minute to loosen chunks.
- First cook (from frozen): Place wings in a single layer in the basket. It’s okay if they touch a little, but avoid stacking.Air fry at 360°F for 12–15 minutes. This stage thaws and begins rendering fat.
- Drain and blot. Carefully remove the basket and pour off any liquid. Pat wings lightly with paper towels to remove excess moisture.This step boosts crispiness.
- Season. Toss wings with a light spray of oil (or 1–2 teaspoons oil) plus 1 teaspoon kosher salt, 1/2 teaspoon black pepper, 1 teaspoon garlic powder, 1/2 teaspoon onion powder, and 1 teaspoon paprika. For extra crackle, add 1 teaspoon aluminum-free baking powder and toss well.
- Second cook (crisping stage): Return wings to the basket in a single layer. Air fry at 400°F (204°C) for 10–14 minutes, shaking the basket or flipping wings halfway.They’re done when the skin is deeply golden and the internal temperature hits 165°F (74°C).
- Adjust for size and model. Smaller wings may be done sooner; larger, meatier wings might need a few extra minutes. Add time in 2-minute increments until crispy.
- Sauce or dry rub. For sauced wings, toss immediately with warmed sauce in a large bowl. For dry-rub lovers, add an extra sprinkle of seasoning while hot.
- Rest and serve. Let wings rest 2–3 minutes to set the crust.Garnish if you like and serve with dips and crunchy veggies.
Printable Recipe Card
Want just the essential recipe details without scrolling through the article? Get our printable recipe card with just the ingredients and instructions.