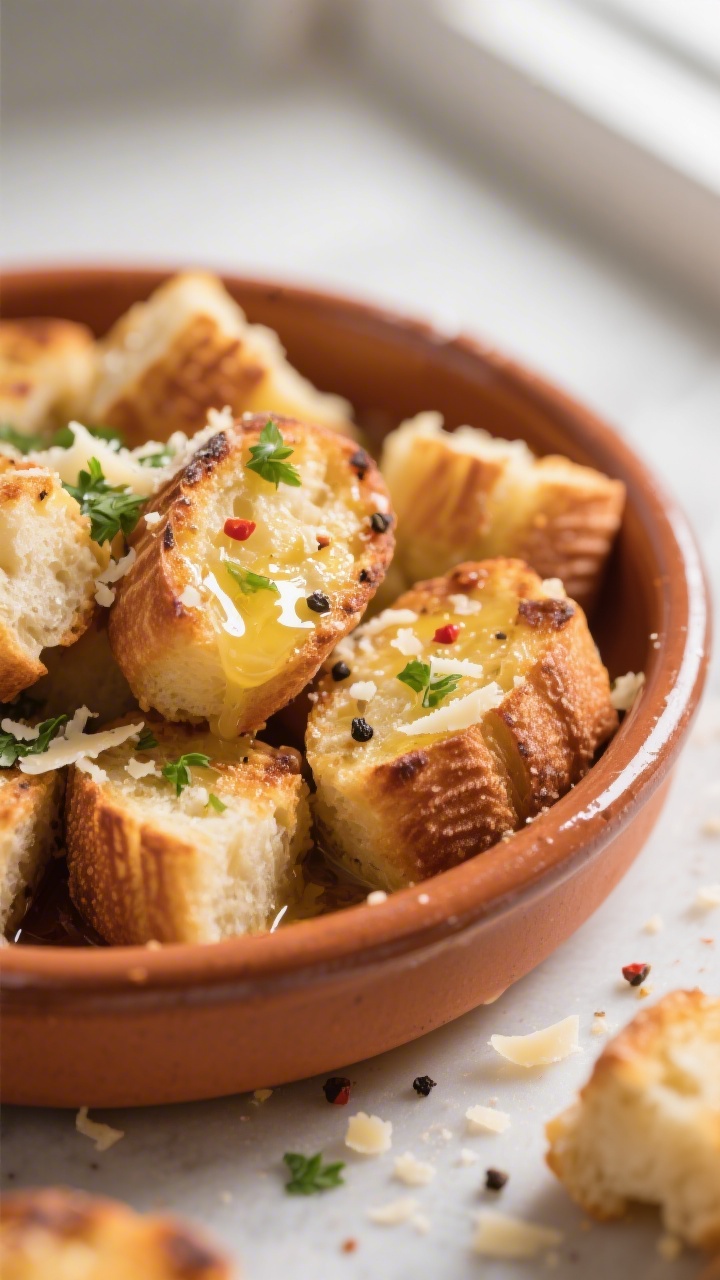
Garlic bread is one of those simple pleasures that never gets old, and these air fryer garlic bread bites take that comfort to a fun, snackable level. They’re bite-sized, golden, and loaded with buttery garlic flavor in every piece. Perfect as a quick appetizer, a side for pasta night, or something to put out for game day.
Best of all, they cook fast and evenly in the air fryer, so you can have warm, crunchy-on-the-outside, soft-on-the-inside bites in under 15 minutes.
In this article:
What Makes This Special
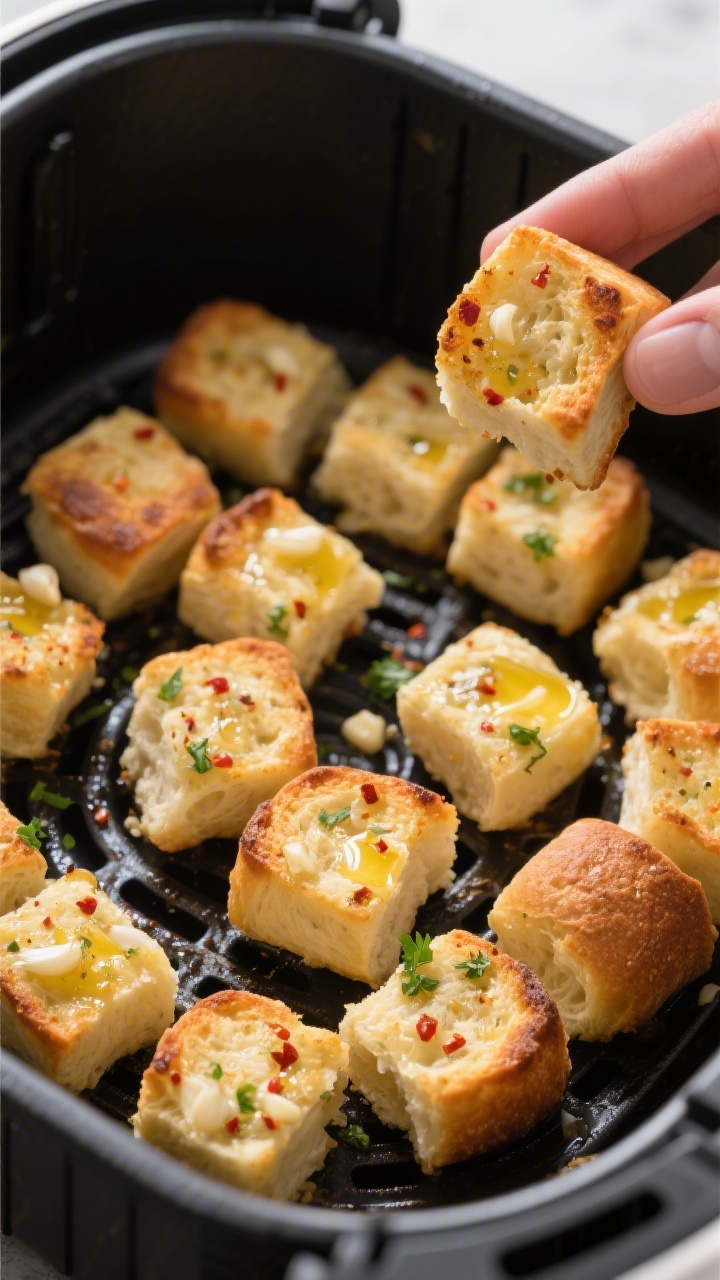
These garlic bread bites use simple pantry staples and a shortcut dough to keep things easy. You get the classic buttery-garlic-parsley combo, but in cute little pieces that cook in a flash. The air fryer gives them a crisp finish without heating up your whole kitchen.
They’re great for dipping in marinara, ranch, or a cheesy sauce, and they’re the kind of snack that disappears fast.
Ingredients
- 1 pound pizza dough (store-bought or homemade), at room temperature
- 4 tablespoons unsalted butter, melted
- 2 tablespoons olive oil
- 4 cloves garlic, finely minced (or 1 teaspoon garlic powder in a pinch)
- 1/3 cup grated Parmesan cheese
- 2 tablespoons fresh parsley, finely chopped (or 1 teaspoon dried parsley)
- 1/2 teaspoon kosher salt, plus more to taste
- 1/4 teaspoon black pepper
- 1/4 teaspoon red pepper flakes (optional, for a little heat)
- Nonstick spray or a little oil for the basket
- Warm marinara or ranch, for serving (optional)
Step-by-Step Instructions
- Preheat the air fryer: Set your air fryer to 375°F (190°C). Let it heat for 3–5 minutes so the bites start crisping right away.
- Prep the dough: Lightly flour your surface. Roll or stretch the pizza dough into a rectangle about 9×12 inches.
Aim for about 1/2-inch thickness so the bites stay soft inside.
- Cut into bites: Use a knife or bench scraper to cut the dough into 1-inch squares. If you like, gently round the edges with your fingers, but it’s not required.
- Make the garlic butter: In a small bowl, mix melted butter, olive oil, minced garlic, salt, pepper, red pepper flakes (if using), and half the parsley. Stir in half the Parmesan.
- Toss the dough: Add the dough pieces to a large bowl.
Pour over half the garlic butter and toss to coat. Reserve the rest for after cooking.
- Prep the basket: Lightly spray or brush the air fryer basket with oil to prevent sticking. Don’t use aerosol spray directly if your basket’s manual advises against it; brush on oil instead.
- Arrange and cook: Place the dough bites in a single layer with a little space between them.
Cook for 6–8 minutes, shaking the basket or turning the bites halfway through, until golden and puffed.
- Finish with flavor: Transfer hot bites to a bowl. Toss with the remaining garlic butter, the rest of the Parmesan, and the remaining parsley. Taste and add a pinch more salt if needed.
- Repeat if needed: If you have more dough, cook in batches to avoid overcrowding.
Bites crisp better with space.
- Serve warm: Enjoy right away with marinara or your favorite dip.
Keeping It Fresh
– Storage: Cool completely, then store in an airtight container at room temperature for up to 1 day, or refrigerate up to 3 days. – Reheating: Air fry at 350°F (175°C) for 3–4 minutes until warm and crisp again. You can also use a toaster oven. – Freezing: Freeze in a single layer on a sheet pan until solid, then transfer to a freezer bag for up to 2 months. Reheat from frozen at 350°F for 5–7 minutes. – Pro tip: Refresh with a quick brush of melted butter and a sprinkle of Parmesan after reheating for that fresh-from-the-fryer feel.

Benefits of This Recipe
- Quick and easy: From start to finish, you’re under 20 minutes once the dough is ready.
- Kid-friendly and crowd-pleasing: Bite-sized pieces are fun to eat and great for sharing.
- Customizable: Switch up cheeses, herbs, or add spice to match your taste.
- Less mess: The air fryer keeps your oven off and your kitchen cool.
- Perfect for dipping: They pair with marinara, pesto, Alfredo, or garlic-herb aioli.
Pitfalls to Watch Out For
- Overcrowding the basket: Too many bites at once steam instead of crisp.
Cook in batches.
- Cold dough: Dough straight from the fridge shrinks and gets tough. Let it rest at room temp for 20–30 minutes before shaping.
- Burnt garlic: Raw garlic can scorch if it sits on the basket. Toss well so it clings to dough, and add more butter after cooking.
- Uneven sizes: Different-sized bites cook unevenly.
Aim for uniform 1-inch pieces.
- Skipping the flip: Not shaking or turning halfway can leave pale spots. Give them a quick toss.
Variations You Can Try
- Cheesy pull-apart bites: Tuck a small cube of mozzarella into each dough piece before cooking. Seal edges and air fry as directed.
- Herb explosion:</-strong> Add dried oregano, basil, or Italian seasoning to the butter mix for a stronger herby note.
- Lemon-garlic: Stir in 1 teaspoon lemon zest and a squeeze of lemon juice to the butter at the end for brightness.
- Everything seasoning: Swap parsley and Parmesan for everything bagel seasoning, then finish with a light cream cheese dip.
- Garlic knots style: Roll dough into ropes, tie into small knots, and cook the same way for a classic pizzeria vibe.
- Gluten-free option: Use a gluten-free pizza dough that you know rises and browns well in your air fryer.
FAQ
Can I use canned biscuit dough instead of pizza dough?
Yes.
Cut each biscuit into quarters and proceed the same way. They’ll cook a bit faster, so start checking around 5–6 minutes at 375°F.
What if I don’t have fresh garlic?
Garlic powder works. Use 1 teaspoon in the butter mixture to start, then add a pinch more after cooking if you want a stronger flavor.
Do I need to line the air fryer basket?
Not necessary.
A light brush of oil prevents sticking and helps browning. If you use parchment liners, place them in after preheating and make sure the bites weigh them down.
How can I make them extra crispy?
Brush the bites lightly with olive oil before air frying and cook 1–2 minutes longer. Keep an eye on them so the garlic doesn’t burn.
What dips go best with these?
Warm marinara is classic.
Alfredo, pesto, garlic-herb aioli, ranch, or even a whipped feta dip are all great options.
Can I make them ahead?
You can cut and butter the dough, then refrigerate for up to 6 hours. Bring to room temperature before cooking so they puff properly.
How do I avoid soggy leftovers?
Store uncovered until completely cool to prevent trapped steam, then cover. Reheat in the air fryer to restore crispness, not in the microwave.
Is there a dairy-free version?
Use plant-based butter and skip the Parmesan or sub with a dairy-free grated cheese.
The garlic and herbs still shine.
In Conclusion
Air fryer garlic bread bites are the kind of easy win that fits any night of the week. They’re buttery, garlicky, and satisfyingly crisp on the outside with a soft middle. With simple ingredients and quick cooking, you can serve them as a snack, side, or party plate without stress.
Keep a batch of dough on hand, and you’ll always be just a few minutes away from warm, crave-worthy bites everyone loves. For more dippable party food, try our Croutons or cheesy Pizza Rolls.

Air Fryer Garlic Bread Bites – Crisp, Buttery, and Ready in Minutes
Ingredients
- 1 pound pizza dough (store-bought or homemade), at room temperature
- 4 tablespoons unsalted butter, melted
- 2 tablespoons olive oil
- 4 cloves garlic, finely minced (or 1 teaspoon garlic powder in a pinch)
- 1/3 cup grated Parmesan cheese
- 2 tablespoons fresh parsley, finely chopped (or 1 teaspoon dried parsley)
- 1/2 teaspoon kosher salt, plus more to taste
- 1/4 teaspoon black pepper
- 1/4 teaspoon red pepper flakes (optional, for a little heat)
- Nonstick spray or a little oil for the basket
- Warm marinara or ranch, for serving (optional)
Instructions
- Preheat the air fryer: Set your air fryer to 375°F (190°C). Let it heat for 3–5 minutes so the bites start crisping right away.
- Prep the dough: Lightly flour your surface. Roll or stretch the pizza dough into a rectangle about 9×12 inches.Aim for about 1/2-inch thickness so the bites stay soft inside.
- Cut into bites: Use a knife or bench scraper to cut the dough into 1-inch squares. If you like, gently round the edges with your fingers, but it’s not required.
- Make the garlic butter: In a small bowl, mix melted butter, olive oil, minced garlic, salt, pepper, red pepper flakes (if using), and half the parsley. Stir in half the Parmesan.
- Toss the dough: Add the dough pieces to a large bowl.Pour over half the garlic butter and toss to coat. Reserve the rest for after cooking.
- Prep the basket: Lightly spray or brush the air fryer basket with oil to prevent sticking. Don’t use aerosol spray directly if your basket’s manual advises against it; brush on oil instead.
- Arrange and cook: Place the dough bites in a single layer with a little space between them.Cook for 6–8 minutes, shaking the basket or turning the bites halfway through, until golden and puffed.
- Finish with flavor: Transfer hot bites to a bowl. Toss with the remaining garlic butter, the rest of the Parmesan, and the remaining parsley. Taste and add a pinch more salt if needed.
- Repeat if needed: If you have more dough, cook in batches to avoid overcrowding.Bites crisp better with space.
- Serve warm: Enjoy right away with marinara or your favorite dip.
Printable Recipe Card
Want just the essential recipe details without scrolling through the article? Get our printable recipe card with just the ingredients and instructions.